Goals and Alerts
This screen allows you to define goals and alerts for KPIs, including propagate (copy / duplicate) existing goals to other goal types.
NOTE: Before you
can access goals or alerts, you must define a date range. Once defined,
you may create, propagate, or setup alerts to each resource.
What do you want to do?
Tasks in this Topic Include:
- Define Date Range by Filter
- Create a New Goal
- Delete a Goal
- Set Goal Propagation
- Add Modify a User s E-Mail Address
- Setup Alerts
- Set Alert Frequency
Related Tasks:
- User Access Roles
- Scorecard Setup
- Attendance Setup
- AUX Scorecard Setup
- Custom Metrics Setup
- Custom Metrics Import
- Initial Attendance Score
- Initial AUX Score Import
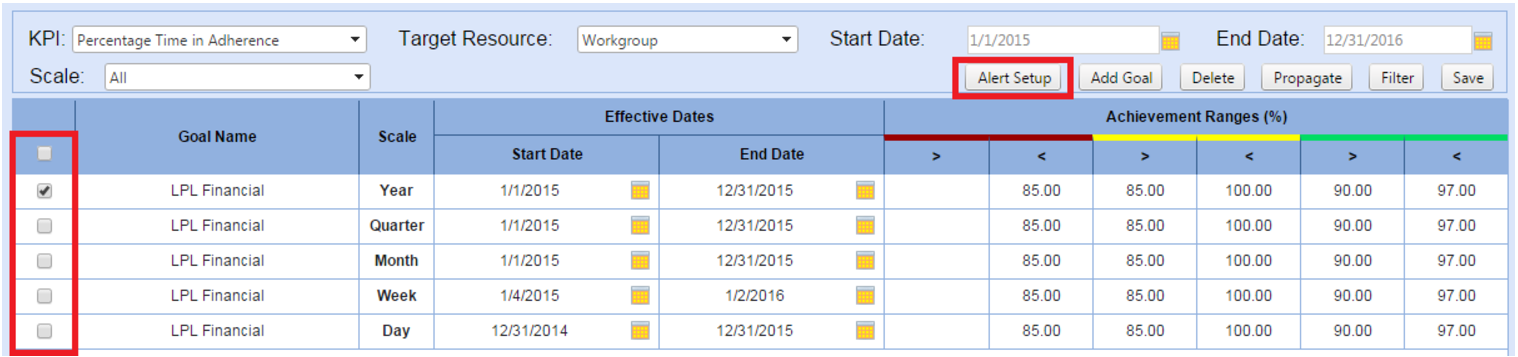
Define a Date Range by Filter
- Select Metrics from the left-navigation menu.
- Select Configuration.
- Select Goals and Alerts.
- Select a KPI from the KPI drop-down menu.
- Select a target resource from the Target Resource drop-down menu.
- Select a Start Date.
- Select an End Date.
- Select the scale in the Scale drop-down menu.
- Select Filter to list all goals
and enable the Add Goal button
to create new goals.
Add a New Goal
NOTE: You may set
multiple goals and alerts for a single Key Performance Indicator (KPI).
- Select the Add Goal button.
- Select a resource from the Goal Name drop-down menu.
- Select a goal unit from the Scale drop-down menu.
- Select a Start Date
 and End Date to select the date range for the new goal
in the Effective Dates column.
and End Date to select the date range for the new goal
in the Effective Dates column. - Enter a numerical goal
value for alerts in each text box that corresponds to the greater
than / less than (< / >) symbols in the Achievement
Ranges (%) column.
- Red: Indicates that the goal is not meeting expectations.
- Yellow: Indicates that the goal achievement is acceptable, but close to not meeting goal expectations.
- Green: Indicates that the goal is being achieved.
-
Select Save.
The new goal is added to the yearly, monthly, weekly, and daily goals list and the new goal data entry section closes.

NOTE: KPIs that are expressed
in percentages do not require an entry in either the far left field (>)
or the far right field (<).
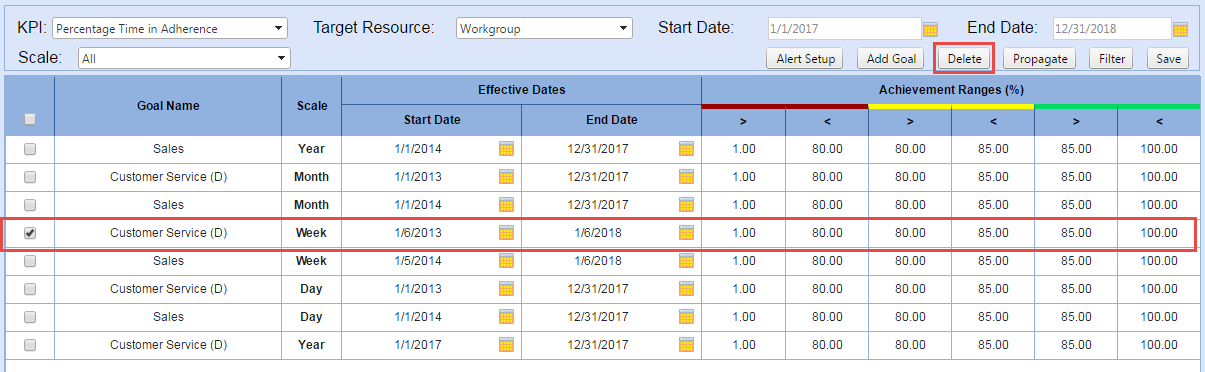
Delete a Goal
- Select the check box of the goal to delete in the Goal Name table.
- Select Delete from the filter region.
- Select OK.
Goal Propagation
- Select the check box of a goal to propagate
in the Goal Name table.
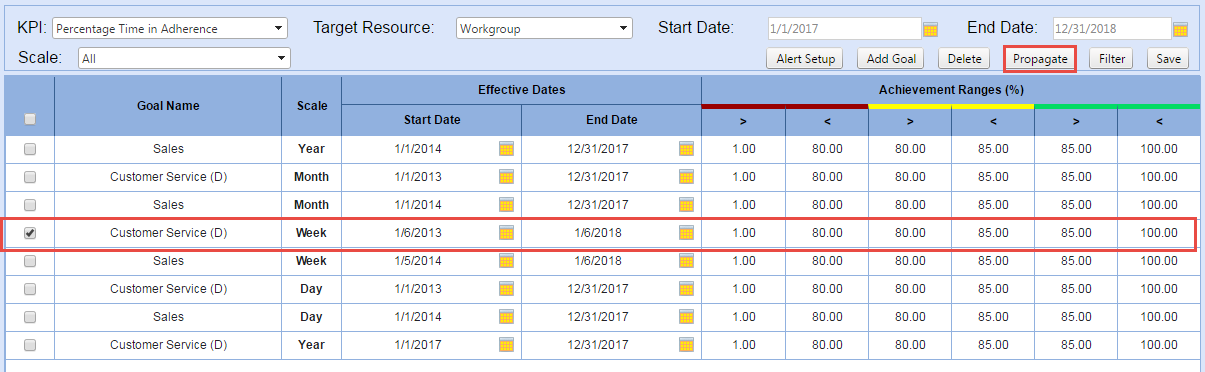
- Select Propagate.
This launches the Propagate To window.
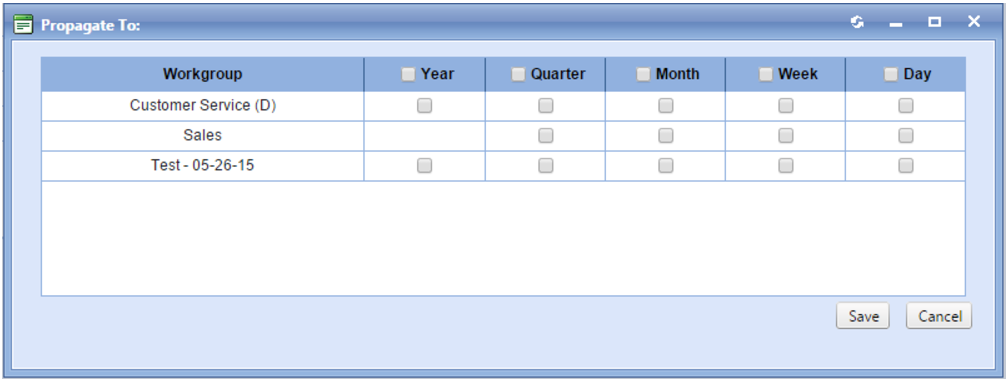
- Select the year, month, week, day, or all goal propagations check boxes as desired.
- Select Save.
Create Goal Alerts
The Alert Setup window allows users to apply alerts to resource types when a KPI falls above or below specific achievement range. For instance, an agent may want to be alerted if the Time in Adherence KPI falls below 5% of the goal.
IMPORTANT:
In order for users to receive alerts, verify that their e-mail address
exists in their Monet
profile.
Add/Modify a User's E-Mail Address
- Select Employees from the left-navigation menu.
- Select Employee List.
- Select an employee.
- Select Edit.
- Select Employee Details.
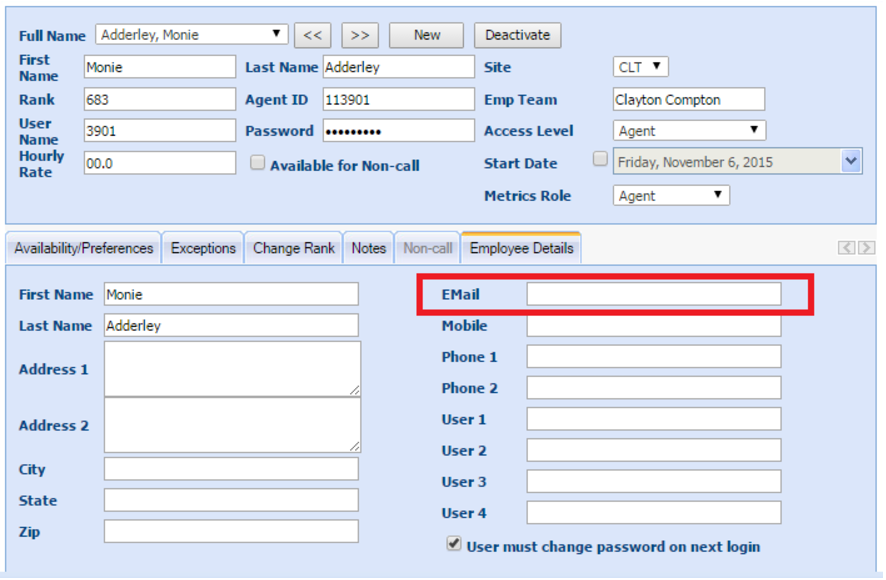
- Enter the employee's e-mail address in the Email field.
- Select Save.
Setup Alerts
NOTE: You may set
multiple goals and alerts for a single KPI.
- Select the check
box of a goal to apply the alert to from the Goal
Name table.
- Select Alert
Setup.
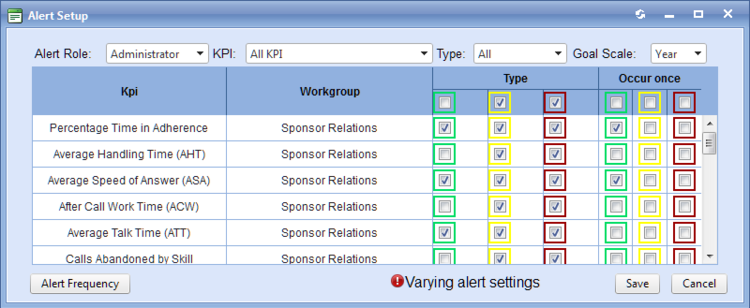
- Select a user role in the Alert Role drop-down menu.
- Select the KPI to apply the alert frequency to in the KPI drop-down menu.
- Select the achievement range to be alerted to in the Type drop-down menu (optional).
- Select the alert frequency unit in the Goal Scale drop-down menu.
- Select the check
box of the KPI for the Type
and Occur Once options as
desired.
Set Alert Frequency
- Select the Alert Frequency button from the Alert Setup window:
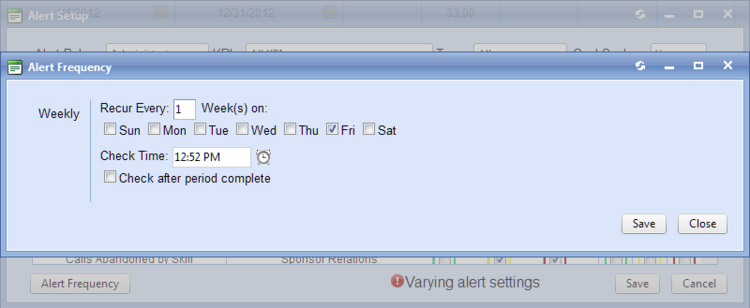
- Complete the following when: Year, Month, or Week is selected:
- Select the check box(es) of the day(s) in which the alert will occur.
- Enter the Recur Every (Period) on: value in the text box.
- Select Check Time
 time picker to set the
alert time of selected days.
time picker to set the
alert time of selected days. - Select Check after period complete (optional).
- Select Save to close the Alert Frequency window.
- Select Save to close the Alert Setup window.
- Complete the following when: Day is selected:

- Select the occurrence level radio button.
- Select
Time Picker to
set the start time.
- Select
Time Picker to
set the End Hour.
- Select Check after period complete (optional).
- Select Apply to close the Alert Frequency window
- Select Save to close the Alert Setup window.