Set Global Options
Global options is where you can set the password criteria for login into Monet, set the default site that displays on login, and set the SFTP reporting server destination details. The SFTP settings are needed if you use the Scheduled Reports feature.
Sets the password criteria for logging in, sets the default site to display on login, and sets the SFTP reporting server destination details.
What do you want to do?
Tasks in this Topic Include:
Related Tasks:
- Create Sites
- Setting Up Hours of Operation
- Applying Service Levels
- Creating Skill Teams
- Applying Shrinkage Parameters
- Applying Non-Call Parameters
- Setting Up Exception Codes
- Import Work History
Setting Security Options
These are user defined components of the password configuration where the security settings are created for logging into Monet.
|
Security Options Fields |
Description |
|---|---|
| Passwords must be at least _ characters in length | Sets the minimum character length for user passwords. Minimum allowable password length is 6 characters. (Passwords cannot be longer than 50 characters.) |
| Passwords must have at least _ of these categories |
Sets the character requirements for passwords. For example, setting this field to 2 would require password to contain characters from 2 of the 4 categories shown. It is not possible to require specific categories.
|
| Disallow username and dictionary words in password | Prevents the password from containing the user’s username, or any word found in the dictionary. (This field is checked by default.) |
| Passwords expire after _ days (0 for no expiration) | Sets the lifespan of the password. Entry can be 0-999 days. 0 means the password never expires. |
| Passwords must be changed on first login | Requires the user to change their password the first time they login. This protects the security of the user’s password by ensuring that only the user knows it. |
| Passwords may not match the most recent _ passwords used | Prevents re-using recent passwords. Entry can be 0-999. For example, setting this field to 3 means the last 3 passwords cannot be used when setting a new password. |
| Users may not change their password more than once every _ hours | Restricts how frequently users can change their password. Entry can be 0-999. For example, setting this field to 8 means the password can only be changed once every 8 hours. |
| Lock accounts after _ failed login attempts within _ minutes | Sets the number of failed login attempts before locking the account. Entry for both fields can be 0-99. For example, setting this to 3 failed login attempts within 2 minutes means the account will be locked if the wrong password is entered 3 times within 2 minutes. Once the account is locked, an administrator must reset the password to unlock it. |
| Save | Saves the changes. |
Security Tab
- Select Setup > Global Option in the left-navigation menu.
- Select the Security
tab.
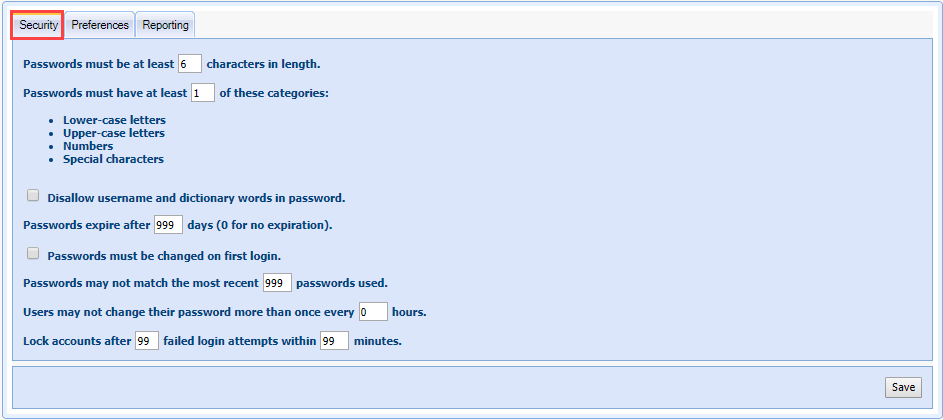
- Enter the password length requirements in the Passwords must be at least characters in length field.
- Select the number of categories a password must contain in the Passwords must have at least of these categories field.
- Select the checkbox to Disallow username and dictionary words in password as desired.
- Enter the password expiration in the Passwords expire after days (0 for no expiration) field.
- Select the checkbox to Passwords must be changed on first login as desired.
- Enter the password reuse limit in the Passwords may not match the most recent _ passwords used field.
- Enter the password change frequency limit in the Users may not change their password more than once every hours field.
- Enter the number of failed login attempts before the account is locked in the Lock accounts after _ failed attempts within 30 minutes field.
- Select Save.
Setting Preferences
| Preferences Fields | Description |
|---|---|
| Default Site | Where the password happens. |
| Save | Saves the changes. |
To set the time zone the system reports in:
- Select Preferences.

- Select the Workgroup Startup Site to display in the ACD time zone, or the Employee Site to display in the local time from the drop-down menu.
- Select Save.
Setting Reporting Options
Reports generated in Monet can be securely sent to customers via an SFTP server.
Reporting
| SFTP Reporting Destinations Fields | Description |
|---|---|
| Name | Identifier of the destination server. |
| SFTP Server Address | Physical address of the destination server. |
| Port | Port number used to post data to the destination server. |
| Username | Username for the account used to post data to the destination server. |
| Folder | Destination folder on the SFTP server |
| Password | Enter a new password. |
| Confirm New Password | Confirm the new password. |
Add a Server
- Select the Reporting tab.
- Select Add Server.
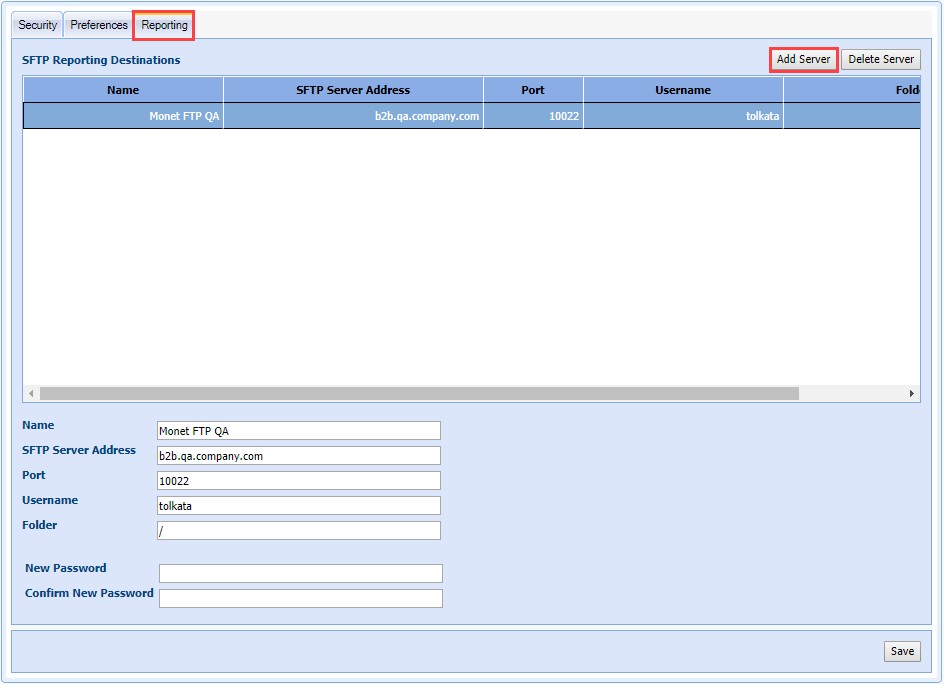
- Enter the server Name.
- Enter the SFTP Server Address.
- Enter the Port number.
- Enter a Username to be used to login.
- Enter the Folder name the reports will be delivered to.
- Enter a New Password and Confirm New Password.
- Select Update Password.
- Select Save.
Delete a Server
- Highlight the server in the SFTP Reporting Destinations table.
- Select Delete Server.
Change the Password
- Enter a new password in the New Password field.
- Enter the same password in the Confirm New Password field.
- Select Update Password.
- Select Save.