Real Time Adherence (RTA) Configuration
Agent activity can be measured and reported on with the RTA feature. Agent states are mapped to ACD states and are reported on. On the ACD State mapping screen, there are four tabs for customizing agent states: Monet Statuses, Status Mapping, Adherence Rules, and Status Ranking. The Monet Status tab will let you add as many statuses as desired to track agent adherence. All of the Exceptions and Non-call statuses will be added by default, and will be considered scheduled activities (along with Available, Break, Lunch, and Logged Out). Monet also classifies each status as being either a Working or Non-Working status (Working Statuses tab). The Working/Non-Working status states are used in the Login/Logout and Tardy/Leave Early calculations for payroll exports, and reporting on Adherence compliance. These statuses will populate the Scheduled Activities grid in the Adherence Rules tab. The user can assign allowed and unallowed statuses to these activities.
RTA (Real-Time Adherence) configuration options include:
- The ability to customize the name and appearance of phone states and scheduled activities
- Add new statuses as required
- Map the phone status codes from the ACD to user-friendly status names
- Define adherence rules
- Set adherence thresholds on all phone statuses
What do you want to do?
Tasks in this Topic Include:
- RTA Configuration
- Monet Statuses Tab
- Editing Statuses
- Creating a Status
- Deleting a Status
- Status Mapping Tab
- Status Mapping Tab
- Map an Imported ID to a Monet Status
- Adherence Rules Tab
- Creating a Custom Adherence Rule
- Editing a Custom Adherence Rule
- Working Statuses
- Set the Status as Working/Non-Working
- Status Ranking
- Multiple Collector Statuses
- Change a Status Rank
- Set Rank to Status
- Unranked Statuses
- Highest Ranked Status
- Invalid Rankings
Related Tasks:
RTA Configuration
- Select Setup > RTA Configuration.
- The screen displays the Monet Statuses tab.
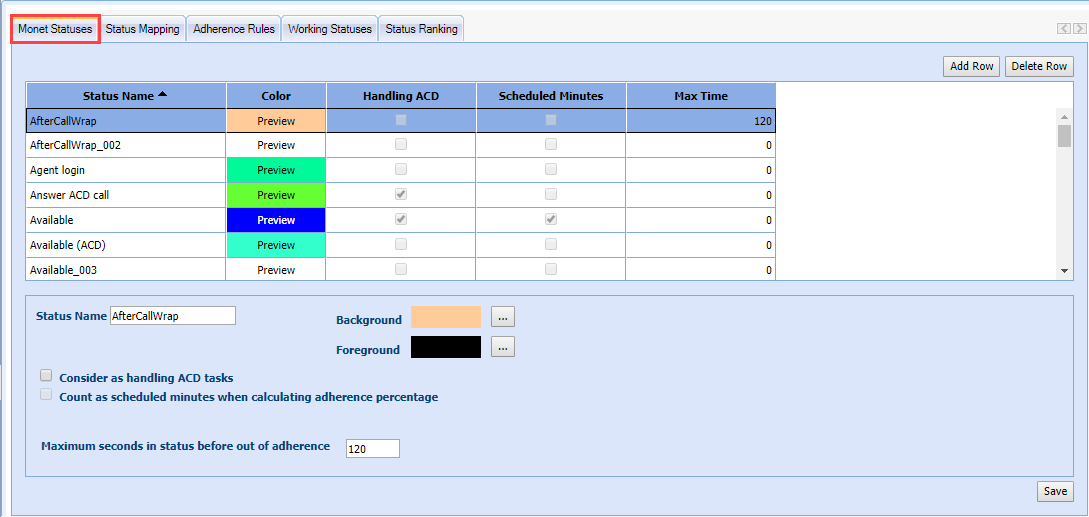
Monet Statuses Tab
The first time you go into RTA Configuration, the Monet Statuses tab will already contain:
- Statuses that were automatically imported from the ACD
- Common statuses that come pre-loaded in Monet
- Scheduled activities within Monet
The Monet Statuses tab will let you add as many statuses as desired to track agent adherence. All of the Exceptions and Non-call statuses will be added by default, and will be considered scheduled activities (along with Available, Break, Lunch, and Logged Out). These statuses populate the Scheduled Activities table in the Adherence Rules tab as activities, which can be allowed or disallowed.
|
Monet Statuses Fields |
Description |
|---|---|
| Status Name | Use to create user-friendly names for statuses from the ACD. The Status Name appears on the RTA screen, Agent Status Report, and Adherence Report. |
| Color | Where the display is set for colors for all phone statuses and scheduled activities. Color controls how the Status or Activity appears on screen. Background is the main color; Foreground is the text color. |
| Consider as handling ACD tasks | Handling ACD means time spent in the status is directly related to taking inbound tasks. This field only applies to agent statuses. |
| Count as scheduled minutes when calculating adherence percentage |
Includes the activity as scheduled minutes for adherence and reporting activities. This field only applies to scheduled activities. Exception statuses where the agent is considered Working (meetings, training) should be counted as scheduled minutes. Exception statuses where the agent is considered Non-Working (PTO, vacation, appointments) should Not be counted as scheduled minutes. These settings affect the Tardy/Early Out and Login/Logout Reports.
|
| Maximum seconds in status before out of adherence | Max Time is the number of seconds that can be spent in a status before the agent is considered out of adherence. |
Editing Statuses
- Select the Status Name in the table to edit.
- Change the Status Name, if appropriate.
- Assign Background and Foreground colors, if desired.
- Check Consider as handling ACD tasks, if appropriate.
- Check Count as scheduled minutes, if appropriate.
- Enter Maximum seconds in status, if appropriate.
- Click Save.
Creating a Status
- Click Add Row.
- Enter a Status Name.
- Assign Background and Foreground colors for how the status will appear in the RTA monitoring screen.
- Check Consider as handling ACD tasks, if appropriate.
- Check Count as scheduled minutes, if appropriate.
- Enter Maximum seconds in status, if appropriate.
- Click Save.
- The new status is saved and added to the table.
Deleting a Status
- Select a status from the table.
- Click Delete Row.
- Click Save. (The status is not actually deleted until Save is clicked.)
NOTES:
- Scheduled activities cannot be deleted.
- Deleting a status that is in use will remove it from all reports.
Status Mapping Tab
Imported statuses from the ACD can be mapped to the Monet Statuses created on the previous tab. This ensures that all statuses visible in Monet have the same user-friendly format.
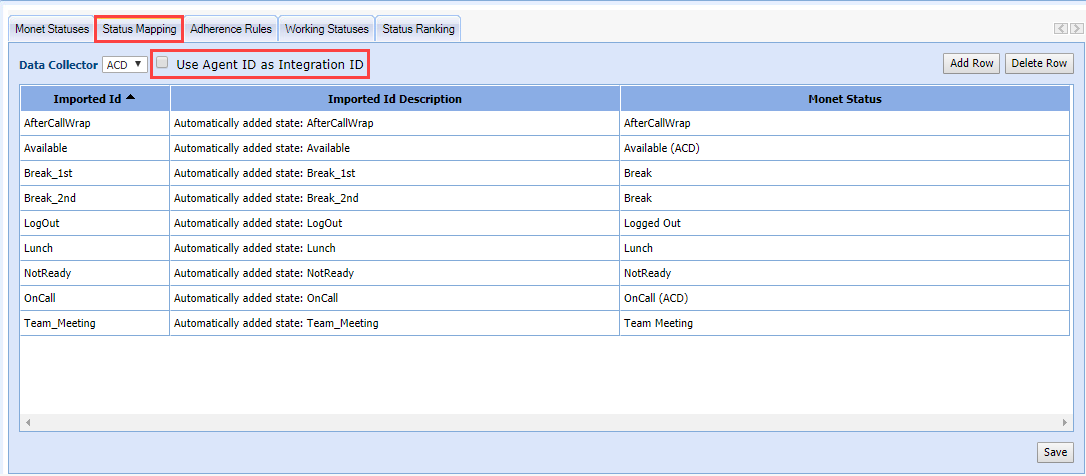
Use Agent ID as Integration ID
The Agent ID can be set as the Integration ID for multiple data collectors using this checkbox. It keeps Agent ID's and Integration ID's in sync for the data collectors it represents.
When new employees are added through the Employee List, or the Employee Import, if this option is checked, then a new Integration Mapping for that data collector is created with the value of that Agent ID.
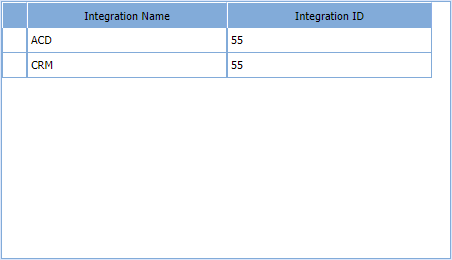
For new Employee Imports, if the Integration ID's column exists, then:
- If there is an entry for this Data Collector, the ID has to match, or it is a validation error.
- Entries for other Data Collectors can be added normally.
Whenever the Agent ID is edited, it updates the Integration ID (the two are kept in sync when this feature is active).
If the user activates this option (and there are existing employees), then integration mappings are created/replaced so that all Agent IDs match the Integration IDs.
Map an Imported ID to a Monet Status
- Click in the Monet Status column on the row of the ID to be mapped.
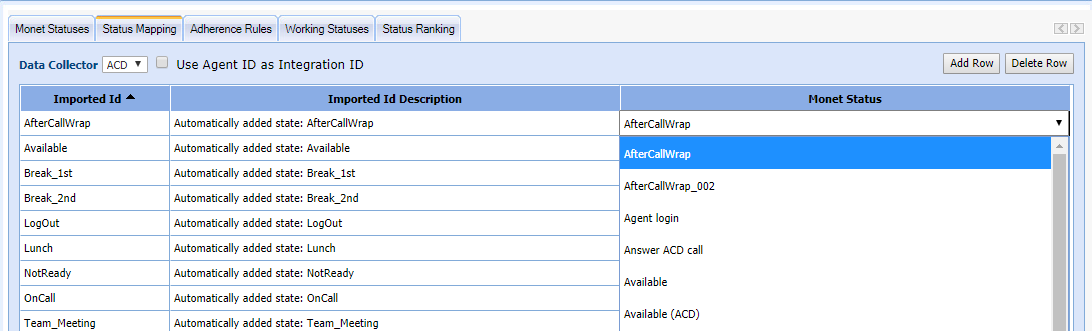
- A drop-down menu opens showing statuses from the Monet Statuses tab.
- Click on a status to select it.
- Click Save.
Adherence Rules Tab
The Adherence Rules tab is where the requirements are set for the contact center by assigning each scheduled activity with its own combination of allowed Monet statuses.
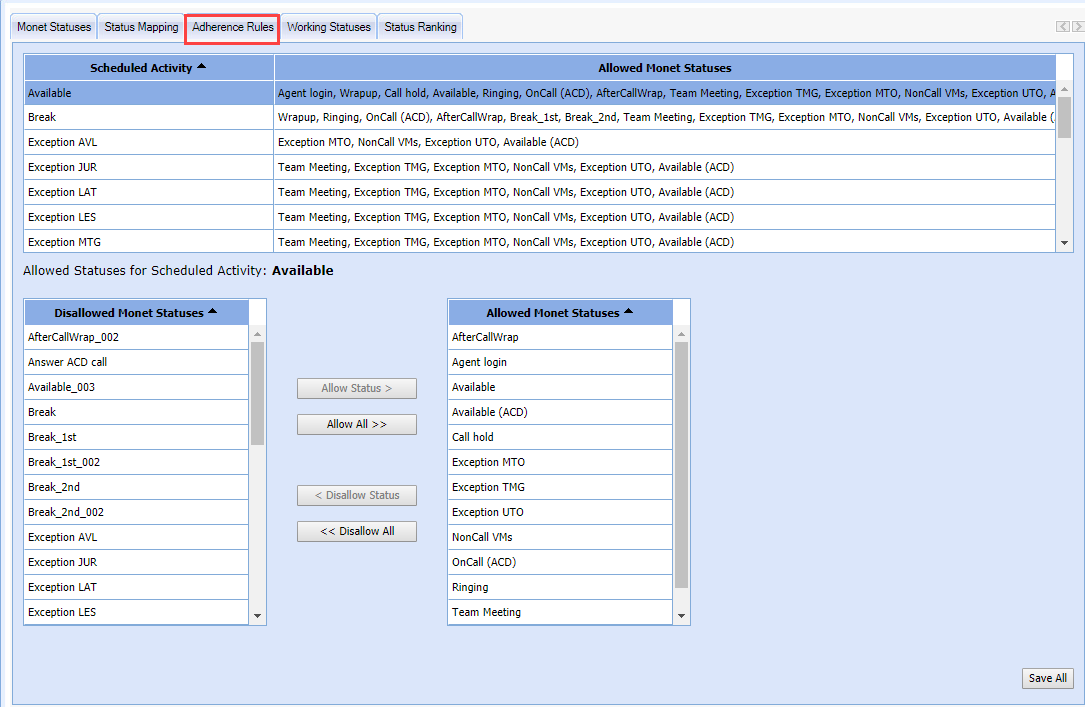
Creating a Custom Adherence Rule
- Select the Scheduled Activity to edit from the Scheduled Activity column.
- Click Allow Status > to move the desired activities from the Disallowed Monet Statuses column to the Allowed Monet Statuses column.
- The selected statuses are moved to the Allowed Monet Statuses column.
- Click Save All.
Editing a Custom Adherence Rule
- Select the Scheduled Activity to edit from the Scheduled Activity column.
- Select the statuses from the Allowed Monet Statuses column to remove from the activity.
- Click < Disallow Status.
- The selected statuses are moved to the Disallowed Monet Statuses column.
- Click Save All.
Working Statuses
A Non-Working or Working status is used in payroll exports; and the Login/Logout, and Tardy/Early Out reports to specify agent activities that affect their attendance.
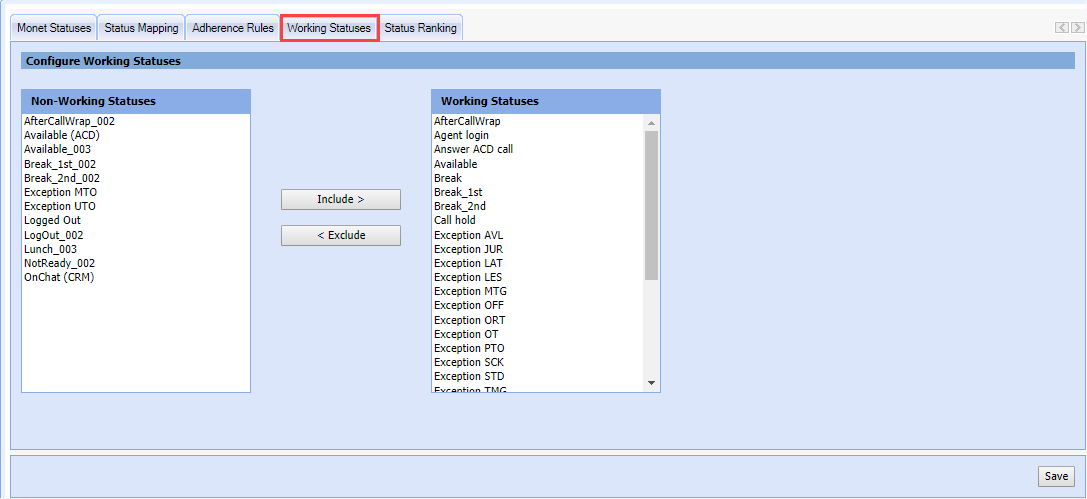
Set the Status as Working/Non-Working
- Select the Working Statuses tab.
- Highlight a Non-Working status.
- Select Include > to move the status to the Working Statuses column.
- Select < Exclude to move the status from Working Statuses to the Non-Working Statuses column.
- Select Save.
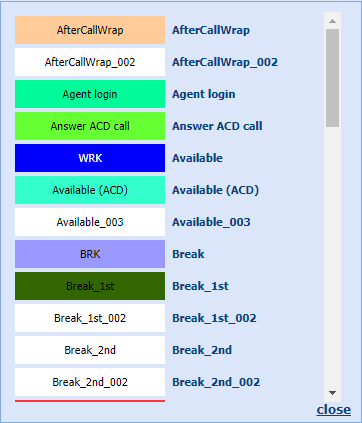
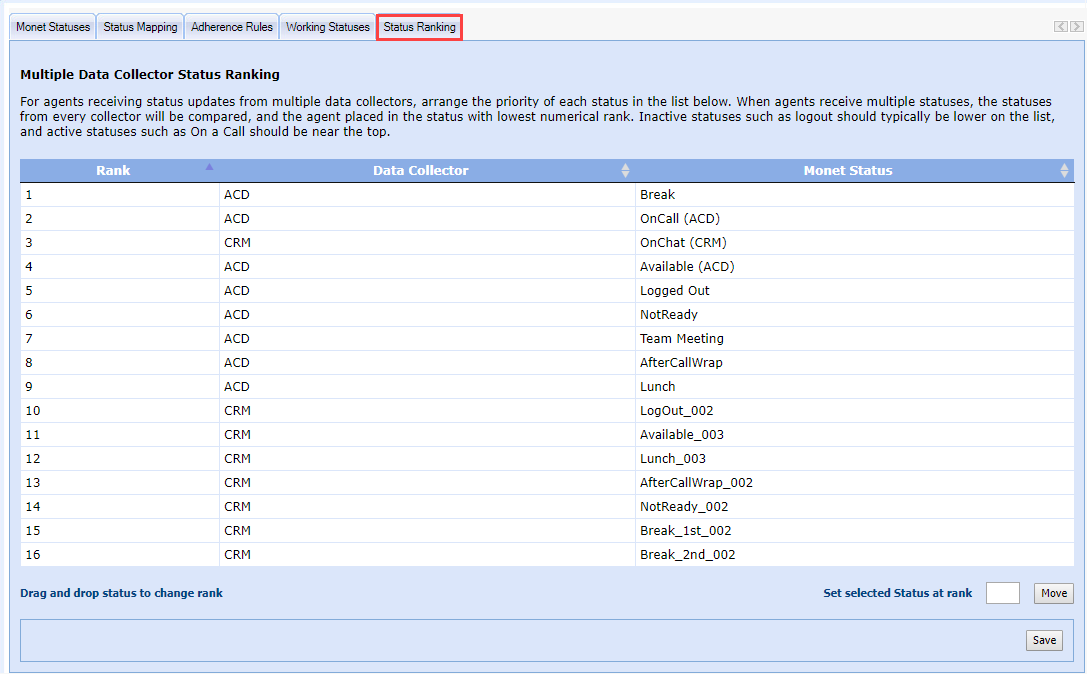
Status Ranking
Status Ranking will display in the Real Time Adherence screen under Manage. Ranking is color coded.
Multiple Collector Statuses
Users may have multiple integrations providing status data for a single agent. This information can be consolidated into a single status. Certain statuses will take priority over one another. For agents receiving status updates from multiple data collectors, arrange the priority of each status in the list below. The statuses from every collector will be compared, and the agent placed in the status with the lowest numerical rank. Inactive statuses, such as logout, should typically be lower on the list. Active statuses, such as On a Call, should be near the top.
Change a Status Rank
- Select the row that will be changed.
- Drag and drop the row to the new rank.
- Click Save.
Set Rank to Status
- Enter an integer in the Set Selected status at rank field.
- Click Move to change the rank of a status.
- The status is given the indicated rank; and all statuses above it move up by one.
Unranked Statuses
When new status mappings are added in the Status Ranking, they are given a ranking automatically by using the next integer available.
Highest Ranked Status
The Data Collector Processor tracks the current status for every integration, but only updates the database when a status is the newly highest ranked. Effectively, an agent is always "in" the status with the highest (lowest numerically) rank, and all calculations use this status.
Invalid Rankings
When loaded, Status Ranking always includes only exactly those Data Collector + Status combinations that exist on the Status Mapping tab. Any combinations that were previously ranked, but have since been deleted, are not visible on this screen. Any combinations that have been added via Status Mapping since this page was previously loaded/saved, are added at the end of the list in the order they were created. The Rank column is sequential and uninterrupted.