View Roster
The View Roster feature allows a WFO Live user to view and edit the shifts of all agents who are assigned for multiple days. Features include un-assigning agents, adding mid-day exceptions, and auto-assign functionality. Roster Generation assigns agents according to their Rank, starting with the lowest numerical rank and increasing from there. Supervisors can change the rank of an agent. AnyWhere provides agents and supervisors with convenient access to scheduling, tracking, and exception planning management functions. Agents are able to view, bid, print, and request schedule changes such as vacation time, while supervisors are able to approve, review, modify, and track schedule changes, vacation requests, and activities for their groups. Monet uses the Employee Preference feature to record agent availabilities that are used in conjunction with Exception Manager to assemble rosters in support of a forecast. Once a roster is complete, the staffing coverages can be viewed to determine if the roster can satisfy the forecast staffing needs.What do you want to do?
Tasks in this Topic Include:
- Roster Filters
- Roster Table Information
- Roster Functionality
- Add New Shift to Roster
- Delete a Schedule
- Copy Schedule
- Un-Assign Employee
- Swap Employee Schedules
- Roster Performance
- Graphical View
- Exceptions
- Add a Non-Call Slot
- Delete a Non-Call Slot
- Assign Option
- Assign Vacant Schedule
- Req. vs Sch. vs Assign
Related Tasks:
Roster Filters
Rosters can be filtered by team and date. The view can be switched to Graphical View.

| Roster Filters Fields | Description |
|---|---|
| Team | A view of the roster for each day. A filter for the roster. |
| Reoptimize | Reoptimizes breaks, lunches, and non-call activities for the full work group. |
| Graphical View | Displays a graphical view of the roster. |
| Date | Select a date from the drop-down. |
| Delete | Delete that day's rosters. |
| Publish | Publishes the roster so the agents can view them. |
Roster Table Information
The information in the table shows agent information for that date including start/end times, break starts and ends, lunch, and Agent Cost.

| Roster Table Fields | Description |
|---|---|
| Blank row without a name | Shift available for bid (U). Shows in the shift bid module. You can assign an agent in this screen to the blank shift. |
| Blank | Auto assigned list of codes (see Roster Assignment Designations). |
| Name | Name of the employee assigned in the roster |
| Team Req. | Team representing the skill requirement of that shift. |
| Team Ass. | Team to which the employee belongs. |
| Start Time | Shift start time in 24-hour format (actual schedule for the day from the roster. Starting Time of the schedule. |
| End Time | End time in 24-hour format. Ending time of the schedule. |
| Break1 Start | Break1 start time in 24-hour format. Starting time of first admissible break in the schedule. |
| Break1 End | Break1 end time in 24-hour format. Ending time of first admissible break in the schedule. |
| Start Lunch | Lunch start time in 24-hour format. Starting time of the lunch break in the schedule. |
| End Lunch | Lunch end time in 24-hour format. Ending time of the lunch break in the schedule. |
| Break2 Start | Break2 start time in 24-hour format. Starting time of second admissible break in the schedule |
| Break2 End | Break2 end time in 24-hour format. Ending time of second admissible break in the schedule. |
| Agent Cost | The cost of the shift; if there is a value, you can sort on it. Cost of the shift. |
| Roster Performance | Compares what was forecasted against what was rostered, and shows the SLA, Abandoned %, etc., and other metrics with the actual schedule. See Roster Performance. |
| Append | Use to add a new shift to the roster. New schedules are preceded with a $ sign signifying that it has been added using the Add New Shift to Roster option. |
| Copy | Select a shift or row from top table and copy it. |
| Un Assign | Removes an employee from a schedule. |
| Swap | Swap with another agent by selecting 2 shifts, and the shifts are swapped. |
| Delete Row | Delete a row (shift) |
| Save | Saving changes made. |
Roster Functionality
Add New Shift to Roster
- From the View Roster work area, select a shift by clicking on it.
- Click Append.
- Enter the details of the shift.
- Click Save.
Delete a Schedule
- From the View Roster work area, select a shift by clicking on it.
- Click Delete. A confirmation window will display:
- Click Yes to delete the schedule.
- Click No to cancel the process.
- Click Save.
Copy Schedule
If a schedule is copied, the system adds a new schedule at the end of the roster with similar parameters like start time, end time, first break, start lunch, end lunch, and second lunch. To copy a schedule, select the schedule #, and click Copy. A copied schedule is preceded by an * signifying that it has been added using the Copy option.
- From the View Roster work area, select a shift by clicking on it.
- Click Copy.
- Click Save.
Un-Assign Employee
If an employee does not attend work, un-assign the employee from the roster.
- From the View Roster work area, select a shift by clicking on it.
- Click Delete.
- Select the employee to be unassigned.
- Click Un-Assign.
- Select the appropriate exception code from the Exception Code drop-down list. Note: The system displays the Description and Number of Hours Represented associated with the code. These fields cannot be altered from this screen.
- Click Select. The system removes the employee details from the roster.
Swap Employee Schedules
If two employees need to swap schedules, do the following:
- From the View Roster work area, select a shift occupied by two employees by clicking them (press Ctrl+Click to select multiple employees).
- Click Swap.
- Select an employee whom should keep their exceptions (optional).
- Click OK.
Roster Performance
Click View Roster, then Roster Performance. The screen loads a table at the top that displays the pre-simulation version of each interval of the day showing the forecasted number of calls/tasks, handle time, required number of agents, assigned number of agents, and the rest of the forecasted assumptions.
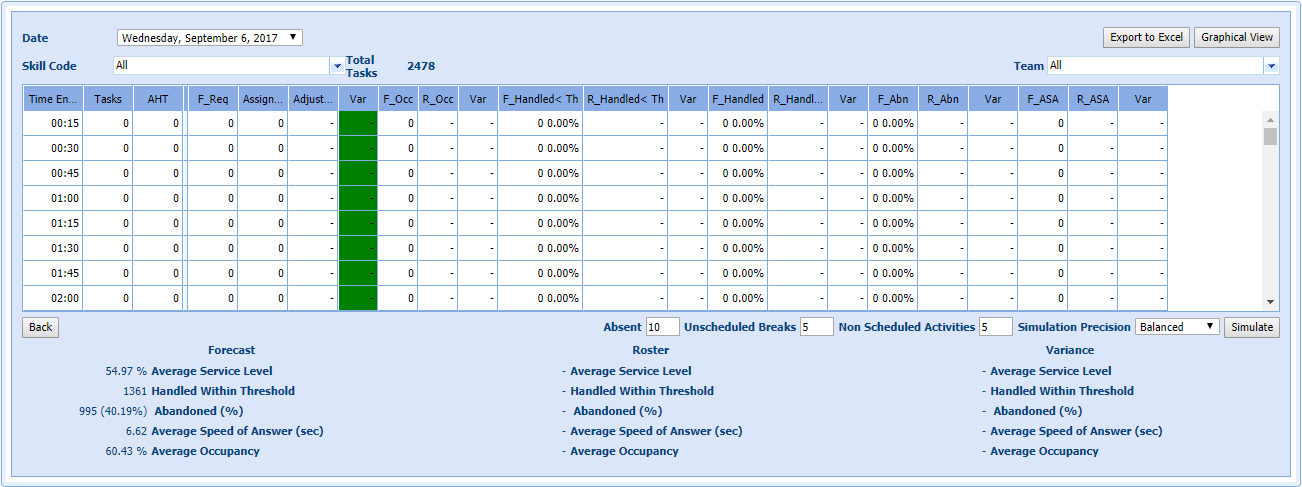
The assumptions from the forecast presume staffing exactly to the requirements generated from the workload. There will be a certain Occupancy, Handled within Threshold, Handled, Abandon, and ASA.
- Below the table there are fields to edit shrinkage (Absent, Unscheduled Breaks, Non Scheduled Activities, and Simulation Precision). Enter the amount of shrinkage expected for this date, and then click Simulate.
- The table has filled in the other columns with assumptions. These are the same assumptions done with the forecast. Only instead of using the staffing numbers that were suggested by the forecast, it displays the results for actual staffing.
- In the summary section at the bottom there is a Forecast Summary, and Roster Summary.
Fields
| Roster Performance Fields | Description |
|---|---|
| Date | Date of the roster. |
| Export to Excel | Button used to display the roster in an Excel spreadsheet format. |
| Graphical View | Button user to display the roster in a graphical format. |
| Skill Code | Three-digit code for a skill. |
| Total Tasks | The total number of tasks for the forecasted date. |
| Team | Skill Team |
| Time Ending | Time period the row represents, shown by period end |
| Tasks | Number of calls received during the 15 minute period |
| AHT | Average Handle Time, i.e. average time spent handling a call including after call work time. |
| Blank | |
| F_Req | The Forecasted Requirement of Employees |
| Assigned | The Actual Employees assigned |
| Adjusted | The adjusted number of agents assigned. |
| Var | Difference between the Assigned and F-Req |
| F_Occ | Roster Occupancy. The actual percent of time employees will spend handling calls during the period. Expect low numbers for small call volumes and/or high service levels. |
| R_Occ | Forecasted Occupancy. The percent of time employees will spend handling calls during the period. Expect low numbers for small call volumes and/or high service levels. |
| Var | Difference between the R_Occ and F_Occ |
| F_Handled < Th | Forecasted Handled within Threshold-Total number of calls that will be serviced within the threshold from required service level. |
| R_Handled < Th | Roster Handled within Threshold-Total number of calls that are actually serviced within the threshold from required service level |
| Var | Difference between R_Handled<TH and F_Handled<TH |
| F_Handled | Forecasted number of calls which are handled by the employee during that time. |
| R_Handled | Actual number of calls which are handled by the employee during that time of the roster. |
| Var | Difference between the R_Handled and F_Handled |
| F_Abn | Forecasted number of calls which are abandoned during that time. |
| R_Abn | Roster Abandoned (i.e. actual number of calls that are abandoned during that time of the day). |
| Var | Difference between the R_Abn and F_Abn |
| F_ASA | Forecasted average speed of answer for calls to be answered |
| R_ASA | Actual Roster generated average speed of answer for calls to be answered |
| Var | Difference between R_ASA and F_ASA |
| Back | Returns the view back to the View Roster home screen. |
| Absent | Enter a value for the number of absences. |
| Unscheduled Breaks | Enter a value for the number of unscheduled breaks. |
| Non Scheduled Activities | Enter a value for the number of non-scheduled activities. |
| Simulation Precision | Fastest, Fast, Balanced, Precise, Most Precise |
| Simulate | Creates a simulation |
| Forecast | A summary of the forecast. |
| Roster | A summary of the roster. |
| Variance | A summary of the variance. |
Graphical View
By clicking Graphical View, you will be transferred to the Graphical View display. See Graphical View.
Exceptions
Mid-day Exceptions can be added here.
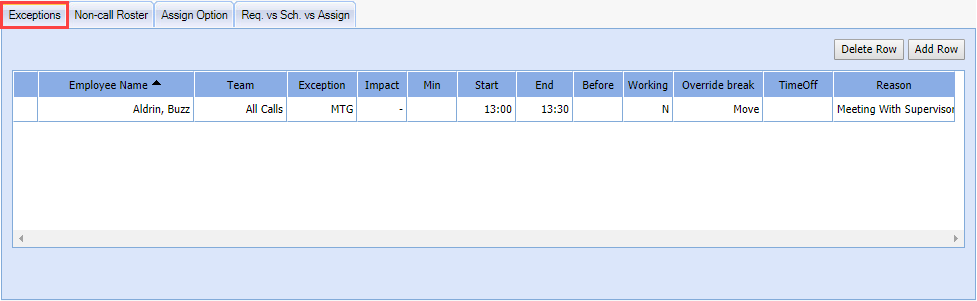
Exceptions Tab Fields
| Exceptions Tab Fields | Description |
|---|---|
| Delete Row | Deletes a row from the exception table. |
| Add Row | Adds a row to the exception table. |
| Employee Name | Name of the agent in the roster. |
| Team | Skill Team. |
| Exception | A 3-digit exception code. |
| Impact | Plus (+) if agent is working overtime; Minus (-) if the absence has a negative impact; Neutral (N)is an agent is working an entire day of overtime. Depending on what is chosen, other fields will be grayed out. |
| Min | Positive - filled out (number of minutes) |
| Start | Start time of the exception in 24-hour format. |
| End | End time of the exception in 24-hour format. |
| Before | Before or After the agent's schedule. |
| Working | Is the agent working (Y) or not working (N). |
| Override Break | Move, Move Always, Override. |
| TimeOff | Value counted toward the time off calendar (manage exception calendar date timeoff button). |
| Reason | Description of the exception. |
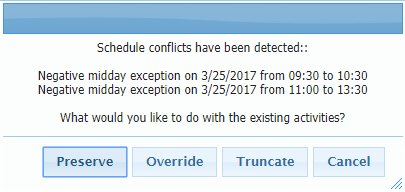
Exception Conflict Resolution
When an exception conflicts with another scheduled activity, the existing activity can be overridden, moved, truncated, or preserved. Preserve allows administrators to enter a full day's schedule of mid-day exceptions, and have Monet automatically create exceptions around the other existing activities like Breaks, lunch, non-call, and other exceptions.
Before the Roster is Generated
Preserve becomes an option before the schedule is generated if:
- The user inputs a new mid-day exception that conflicts with an existing mid-day exception.
- The new exception must conflict and be greater than either the start or end time of the existing exception, or both.
After the Roster is Generated
Preserve becomes available if there are any conflicts with existing activities other than "Available" time:
- Breaks
- Lunch
- Non-call
- Mid-day negative or neutral exceptions
Overlap
The new exception only occupies the space before or after the existing exception. If there is a Full-Overlap that Exceeds Both Start and End Times of an Existing Exception, two new exceptions are created to fill in the space around the existing exception; and the existing exception is left intact.
Personal Hours and Time Off Hours Handling
If the new exception contains Personal Hours or Time Off hours, the value for the exception being entered is split proportionally across the new exceptions being created.
Break and Lunch
Move/Move Always/Override break and lunch handling is taken from the exception as it is created.
- The conflict resolution dialogue is only shown when a break or lunch will be overridden, regardless of the Move/Move Always/Override user selection. When this dialog is received, Preserve is an option. If the break or lunch can be moved with the Move/Move Always selection, the dialogue is not shown.
- The dialog is always brought up if Override is selected, and an existing activity will be deleted.
- The Preserve option will always display except in one case:
- The exception does not exceed either the start nor the end of the existing activity (multiple if the existing activities are adjacent).
- If neither the start nor end time of the new exception goes beyond the start or end time of the existing activities, then the Preserve option is not displayed.
- When the user selects Override, the conflict dialogue is brought up. The user selects Preserve, then the breaks and lunch are kept in place.
- If an exception conflicts with other scheduled activities, the exception
entry conflict dialog displays showing where conflicts were detected.
Choose to Preserve the existing
activities, Override, Truncate,
or Cancel the exception addition.
Non-call Roster
A list of agents who are assigned to non-call activities is displayed.

Add a Non-Call Slot
- From Staff > View Roster.
- Select the Non-call Roster tab.
- Click Add Row to add a new row at the end of the list.
- Double-click on the last cell under Activity Name. The system displays a drop-down list of available non-call activities.
- Select the appropriate non-call activity.
- To assign a non-call employee to the slot, double-click the last cell under the Name column. The system displays a drop-down list of non-call employees available for the assignment.
- Select the appropriate employee.
- Enter the starting time for the activity in the Start Time column.
- Enter the ending time for the activity in the End Time column.
- Click Re-Calculate. The system displays Non Call interval details saved successfully.
Delete a Non-Call Slot
- Select Staff > View Roster.
- Select the Non-call Roster tab.
- Select the desired row.
- Click Delete Row.
| Delete a Non-Call Slot Fields | Description |
|---|---|
| Delete Row | Deletes the selected row from the table. |
| Add Row | Adds a row to the table. |
| Checkbox | To select that non-call activity row. |
| Activity Name | Type of non-call activity |
| Name | Agent assigned the activity |
| Team | Skill Team assigned to for that day |
| Start Time | Start of time scheduled to do the activity |
| End Time | End time scheduled to do the activity |
| Recalculate | Affects the summary table below. Values will update. |
| Table | |
| Color Code | Color code that goes with that non-call activity. |
| Activity Name | Name of the non-call activity. |
| Base Staff Hrs. | Gives total of non-call activities from top table. Summary of day |
Assign Option
Use the Assign Option tab to assign a vacant schedule to an agent.
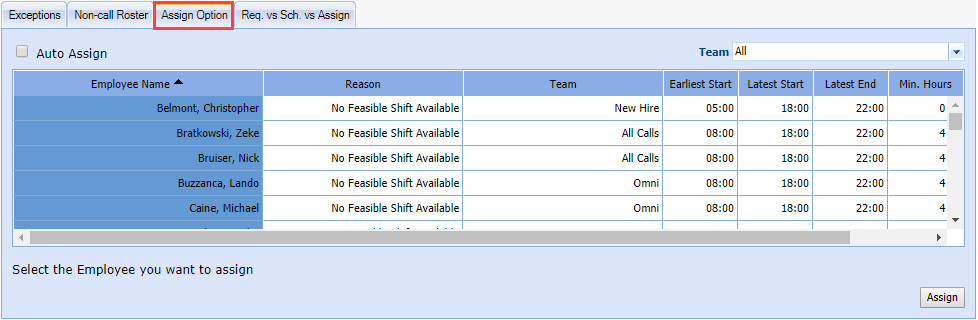
Assign Vacant Schedule
- From View Roster, select the Assign Option tab.
- Select an available shift from the top window.
- Select an Employee from the bottom window.
- Click Assign.
Fields
| Assign Vacant Schedule Fields | Description |
|---|---|
| Auto Assign | If an agent is not assigned, clicking this reruns the roster based off new agent availability and/or change in staffing requirements |
| Team | Skill Team filter |
| Employee Name | Name employee time in 24-hour format. |
| Reason | Why agent not assigned a shift |
| Team | Skill Team |
| Earliest Start | Earliest when the agent can start based on agent availability |
| Latest Start | Latest when the agent can start based on agent availability |
| Latest End | Earliest when the agent can end based on agent availability |
| Min. Hours | Minimum hours based on agent availability |
| Max. Hours | Maximum hours based on agent availability |
| Assign | Assign the agent to a shift. |
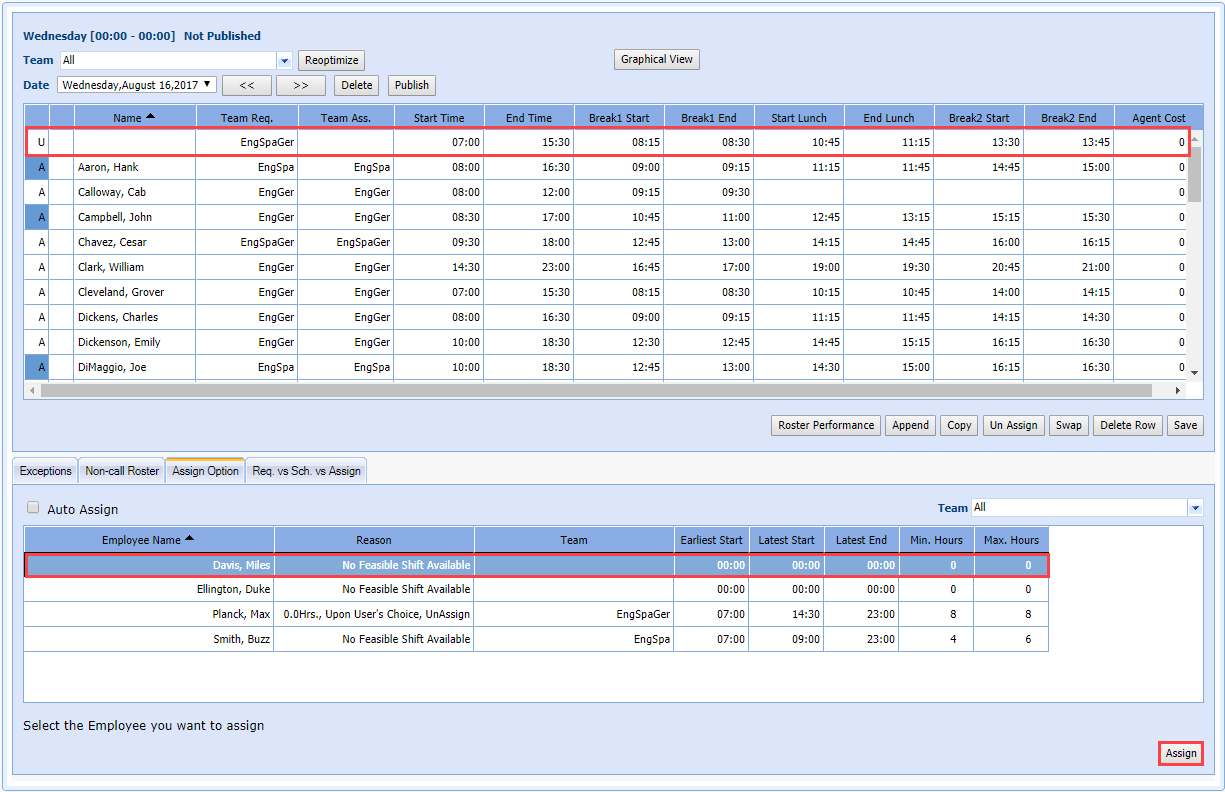
Another agent can be assigned for the shift by selecting the shift, then the employee from the Assign Option table, and clicking Assign.

Req. vs Sch. vs Assign
A line chart shows required and assigned agents per 15-minute interval for that date.
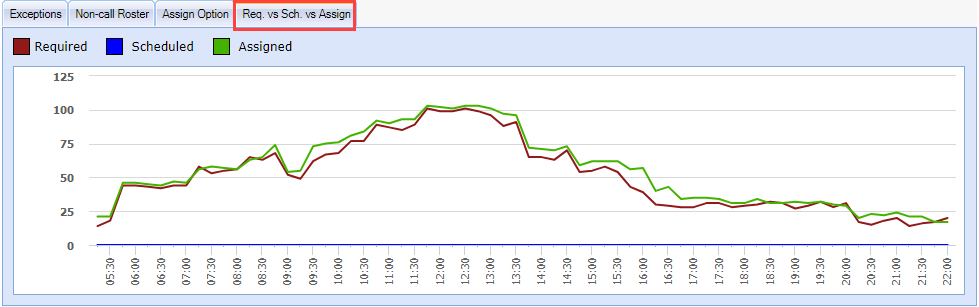
Req. vs Sch. vs Assign Fields
| Req. vs Sch. vs Assign Fields | Description |
|---|---|
| Required | Chart showing number of agents required to be scheduled to meed the SLA objectives (line graph) |
| Scheduled | Only used in certain circumstances. |
| Assigned | How many agents are assigned ( line graph) |