Exception Management
Use this document to become familiar with Exception Management to manage the agents in your contact center efficiently.
What do you want to do?
Tasks in this Topic Include:
- Where to Add Exceptions
- Regular Exceptions
- Regular Exception Examples
- Mid-day Exceptions
- Exception Conflict Resolution
- Mid-Day Exception Examples
Related Tasks:
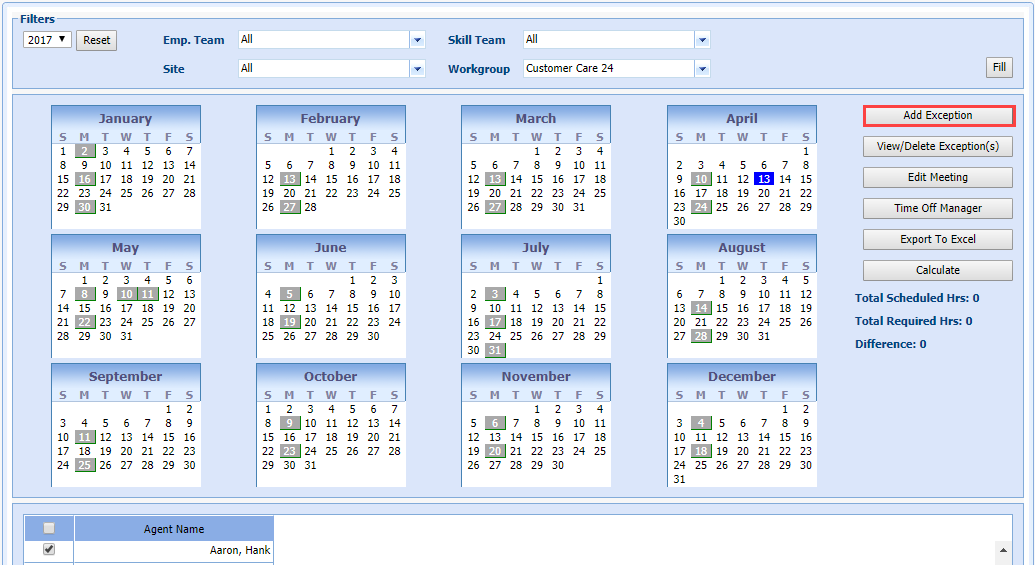
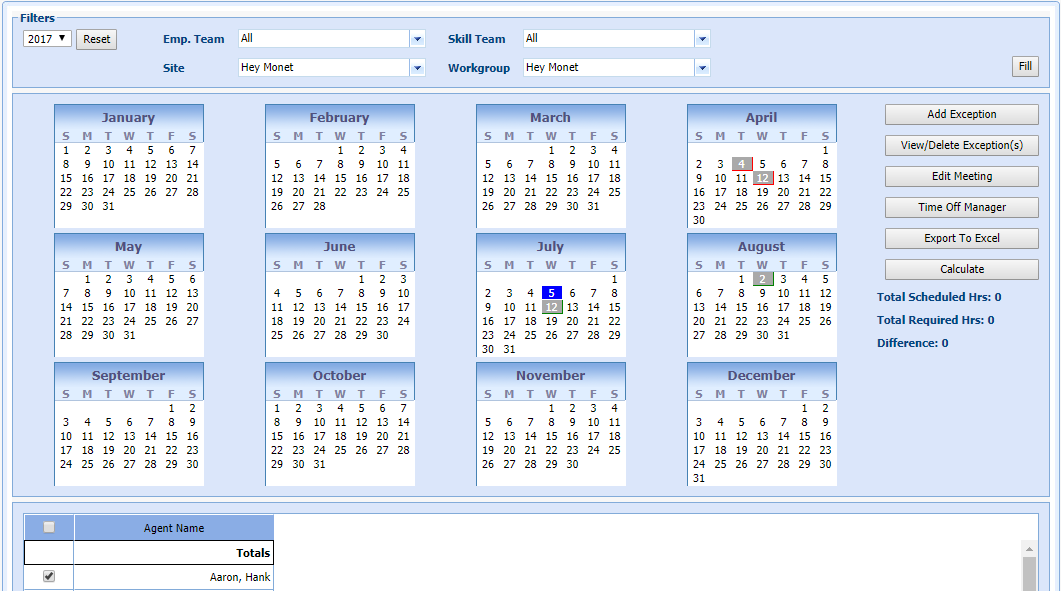
Where to Add Exceptions
Regular and Mid-Day exceptions can be added to an agent schedule from:
- The Exceptions tab under Employees > Employee List
- Manage
> Exception Calendar
Mid-Day exceptions can be added from:
- The Exceptions
tab under Staff > View Roster
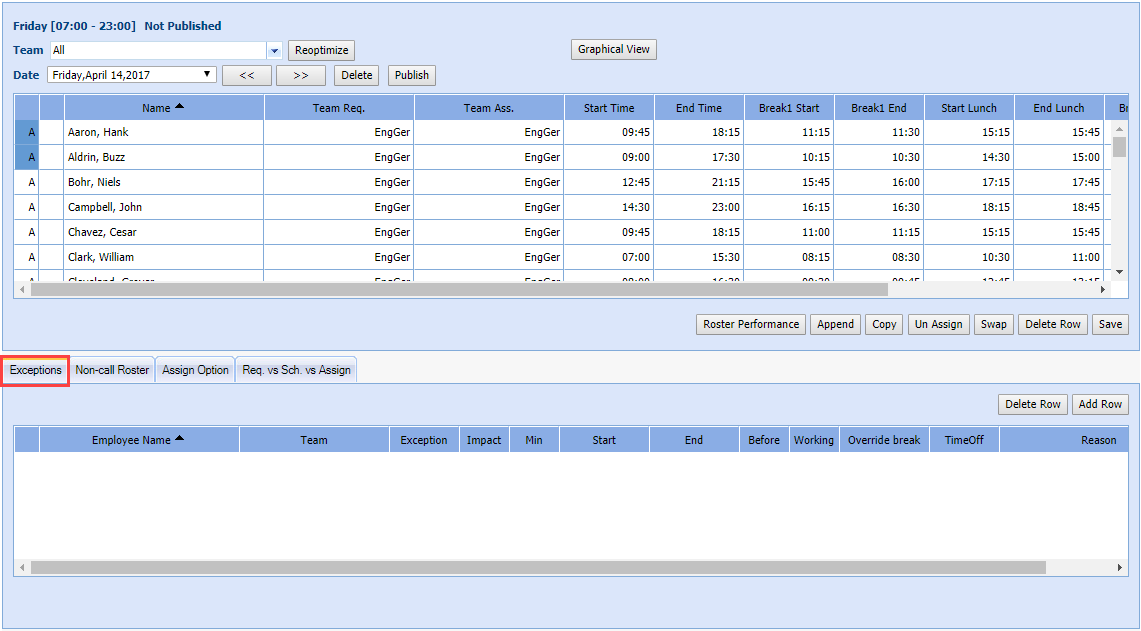
- Staff >
View Roster By Agent
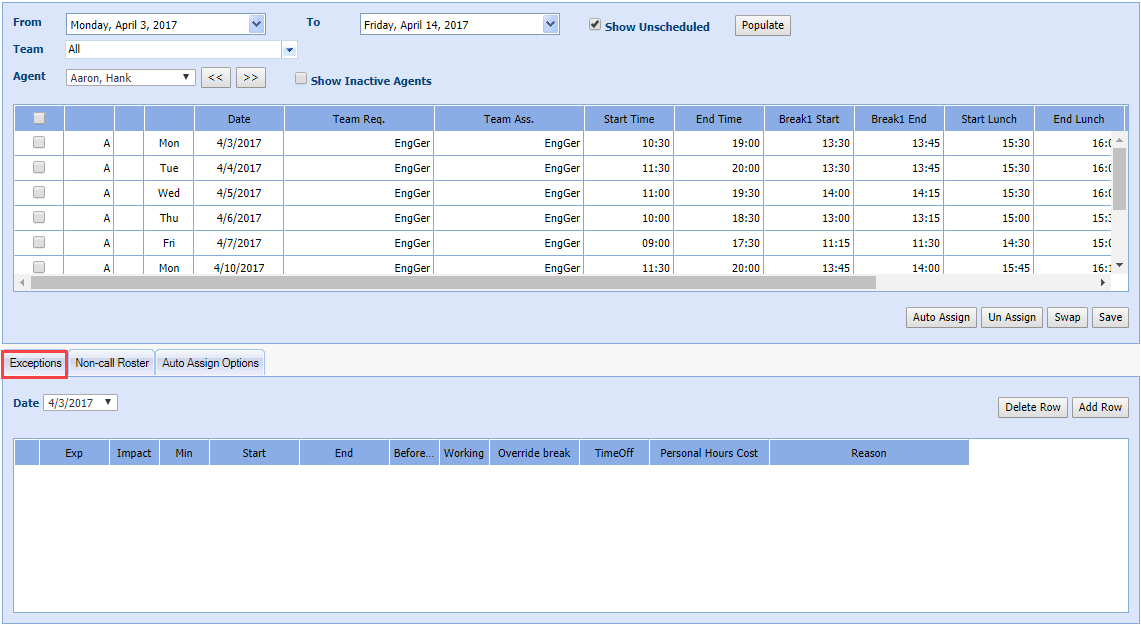
- Staff
> Graphical View

- Manage
> Intra-day
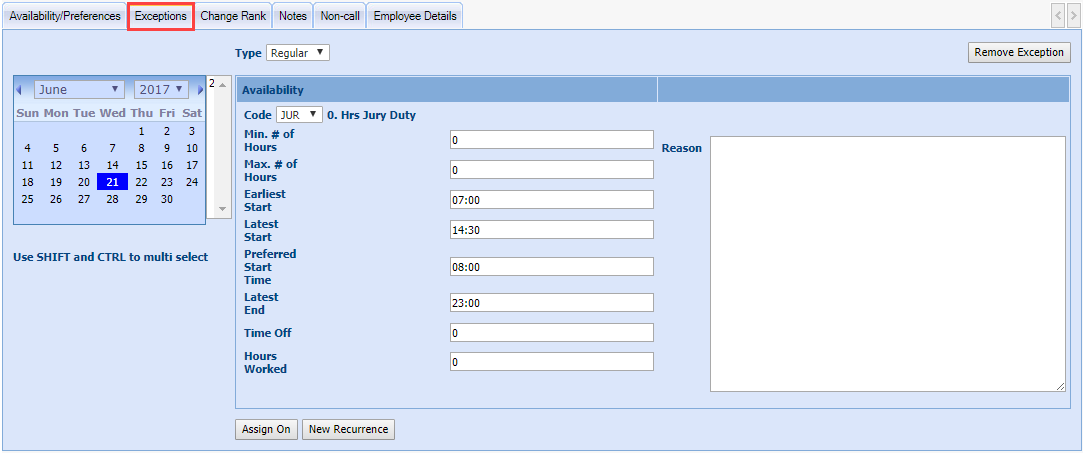
Regular Exceptions
Regular exceptions affect the entire day rather than a portion of the day like the mid-day exception. There are two fundamental types of Regular Exceptions: Day-off and Availability Change. Days off prevent assignment to the roster, and removes the agent from existing rosters. Availability Change exceptions allow the agent to be available for a different range of shifts than what is currently in the employee profile availability section.
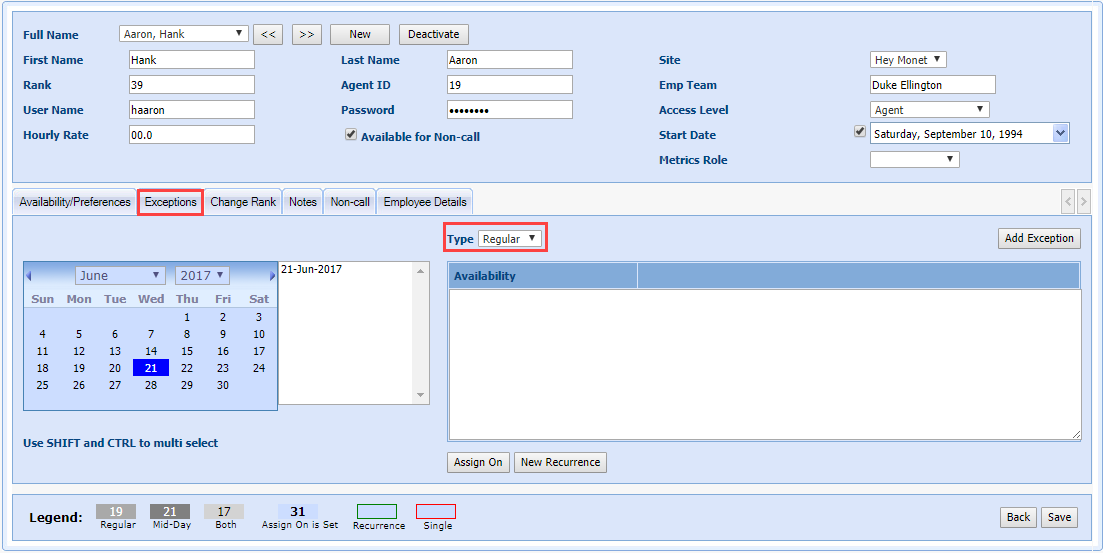
A Reason field is available to add additional information about the Exception.
Regular Exception Examples
Use the following examples to become familiar with processing various types of exception requests. The examples use all the methods described for creating an exception.
Example 1: Agent Vacation Day Request
Agent Hank Aaron wants to take the day off and use some of his paid time off. Although Hank is available 7 days a week, he does not want to make up this day off by working another day in the week to take its place. Hank will be working 32 hours rather than 40 this week.
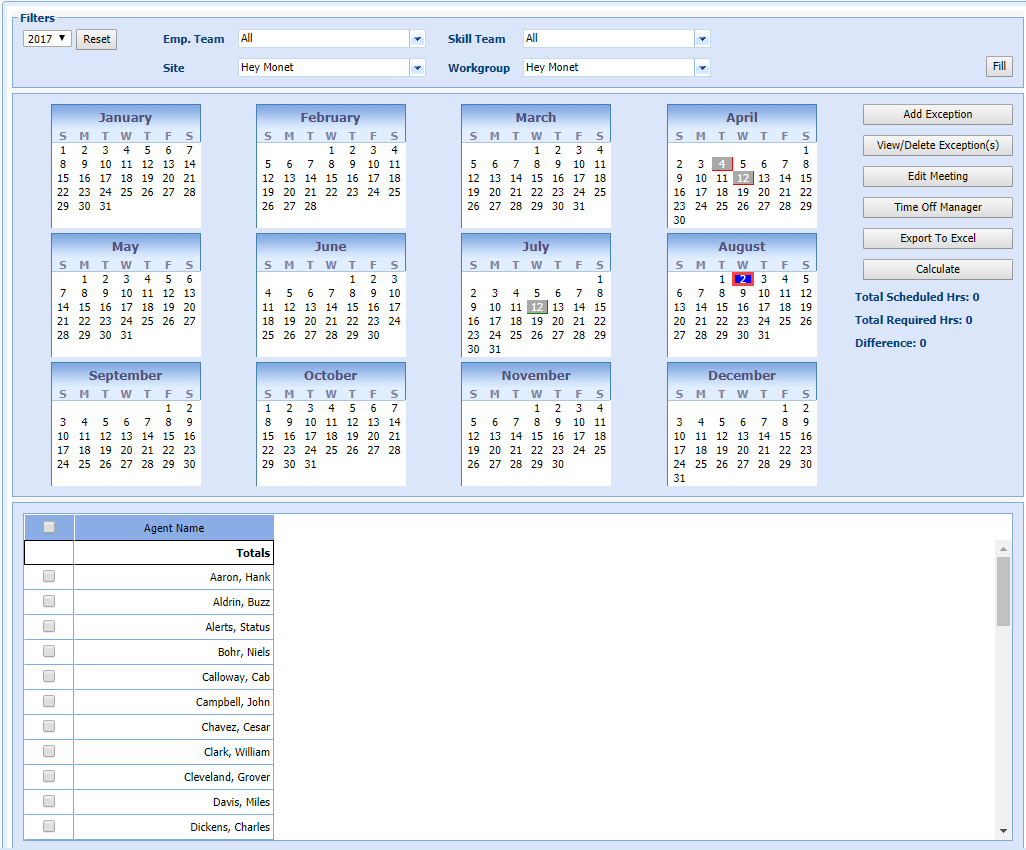
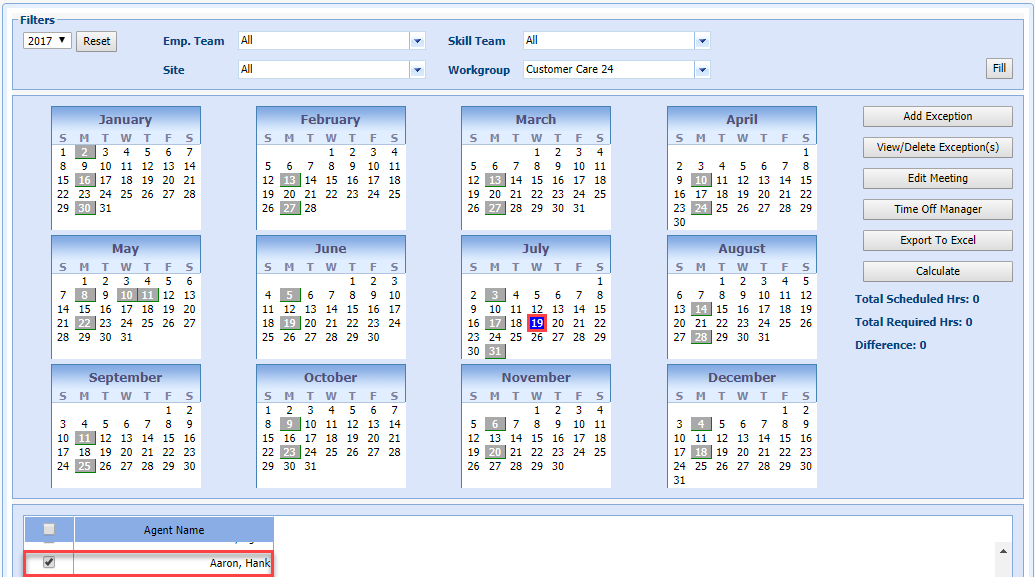
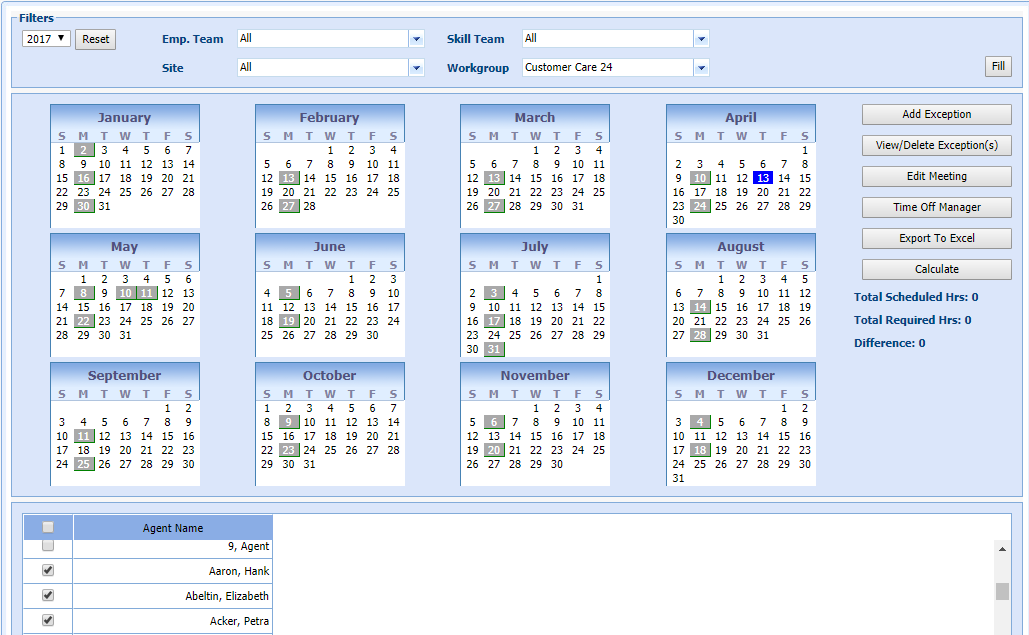
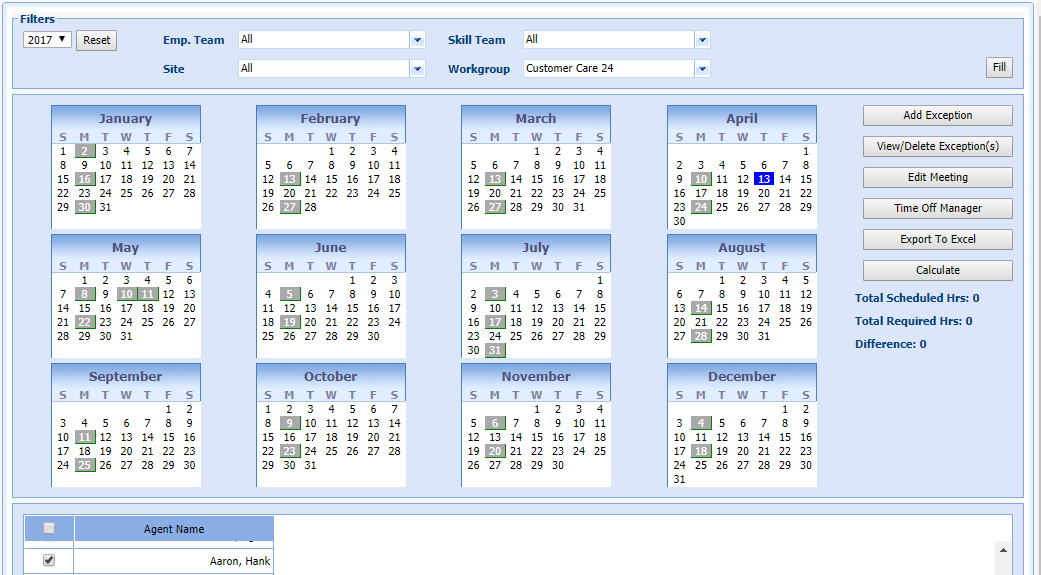
- Select Manage > Exception Calendar in the left-navigation menu.
- Select the check box for Hank Aaron in the Agent Name table.
- Select the Date Hank wants off in the calendar.
- Select Add Exception.
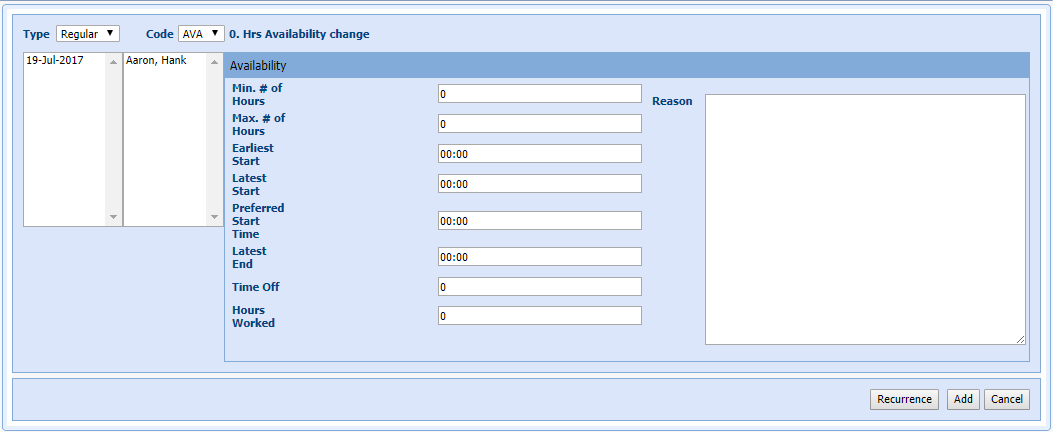
- Select Regular from the Type drop-down menu.
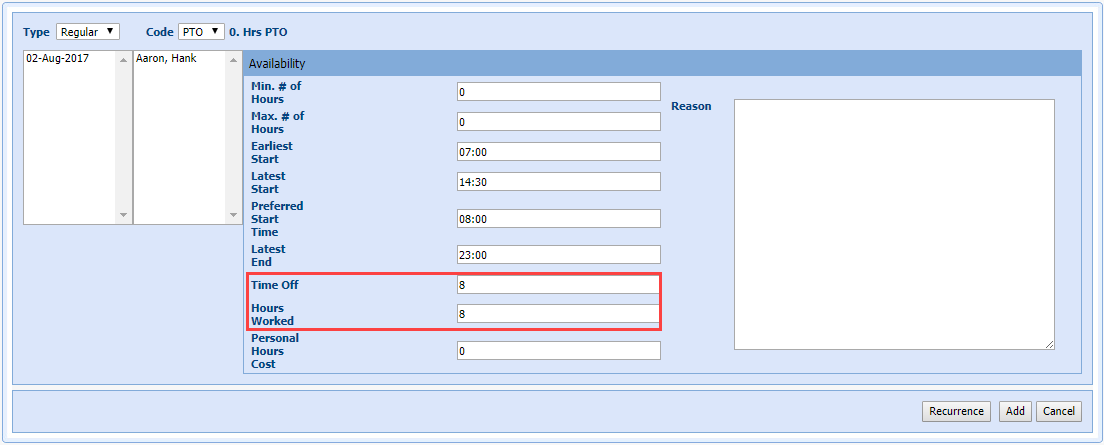
- Select the time off code from the Code drop-down menu.
- The Min # of Hours, Max # of Hours, Earliest Start, Preferred Start, and Latest Start fields are ignored because this is a Day-Off exception type.
- Time Off and Hours Worked are filled in to reflect the amount of hours this shift would count for if it was worked. For example, a 09:00 to 17:30. shift with a 30-minute lunch is 8 hours.
- Personal Hours Cost is filled in to reflect the number of hours to be charged against the Personal Hours account for the agent.
- Enter a Reason, if desired.
- Select Add.
- The date displays highlighted in the calender.
Example 2: Agent day-off with make-up time
Agent Hank Aaron needs Thursday July 19th off to visit with family members travelling through town. He is normally available any day of the week, but is never sure week-to-week what his days off are going to be. He wants to make sure that one of his days off for the week includes July 19th, but is willing to work his full 40-hour work week on any of the other days.
- Select Manage > Exception Calendar in the left-navigation menu.
- Select the check box for Hank Aaron in the Agent Name table.
- Select July 19 in the calendar.
- Select Add Exception.
- Select Regular from the Type drop-down menu.
- Select the Date in the calendar picker.
- Select the code for the time off from the Code drop-down menu.
- The Min # of Hours, Max # of Hours, Earliest Start, Latest Start, Preferred Start, and Latest End fields are ignored because this is a Day-Off exception type.
- Enter 0 in the Time Off and Hours Workedfields.
- Enter a Reason, if desired.
- Select Add.
Example 3: Agent calls out sick
Supervisor Sam receives a call from Agent Hank Aaron that he is out sick today. Sam must adjust the roster to reflect the absence; but since there were two other call outs today, Sam will enter all of these call outs at the same time.
- Select Manage
> Exception
Calendar in
the left-navigation menu.
- Select the check boxes of the 3 agents who called in sick in the Agent Name table.
- Select
Today's date in the calendar and select Add Exception.

- Select Regular in the Type drop-down menu.
- Select the appropriate code for Sick (SCK) in the Code drop-down menu.
- The Min # of Hours, Max # of Hours, Earliest Start, Latest Start, Preferred Start, and Latest End fields are ignored because this is a Day-Off exception type.
- Enter 8 hours in the Time Off field.
- Enter 8 hours worked in the Hours Worked field.
- Enter a Reason, if desired.
- Select Add.
Example 4: Agent is Less Available for Shifts than Normal
Agent Hank Aaron is normally available for either the morning or evening shift as needed; but he needs to work the morning shift on Monday of this coming week, as Monday night he has a date.
- Select Manage > Exception Calendar in the left-navigation menu.
- Select the check box for Hank Aaron in the Agent Name table.
- Select Add
Exception.

- Enter 8 in the Min # of Hours and Max # of Hours to ensure that Hank gets only 8-hour shifts.
- Enter 06:00 in the Earliest Start to reflect Hank's availability for Monday.
- Enter a 07:00 in the Latest Start to reflect Hank's availability for Monday.
- Enter 15:30 in the Latest End to ensure that Hank has enough time to prepare for his date.
- Leave the Time Off and Hours Worked set to 0 as these fields are only used for time off exceptions.
- Enter a Reason, if desired.
- Select Add.
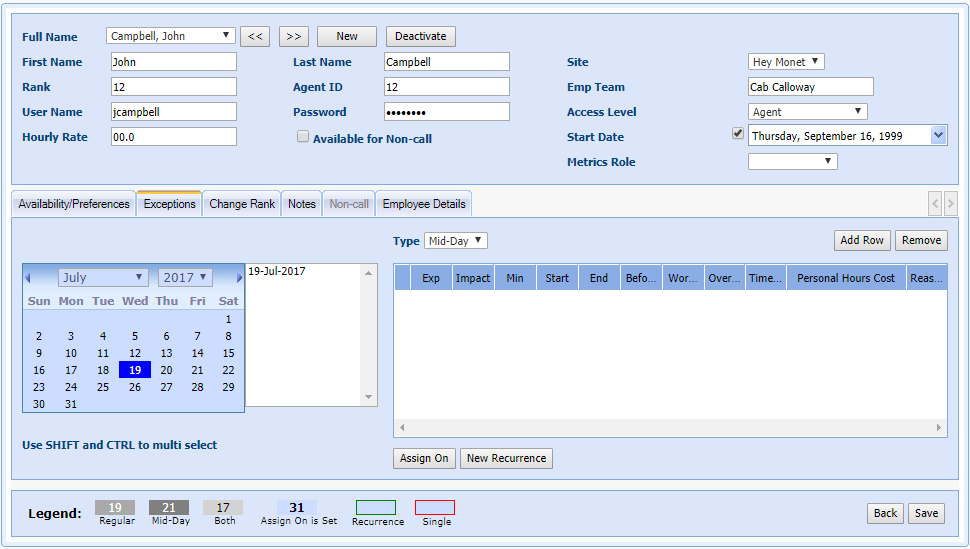
Example 5: Agent Requests Reduced Daily Hours
Agent Hank injures his back; and his doctor orders him to work light no more than 4 hours a day instead of his usual 6 - 10. He can still work anytime from 10am to 10pm.
- Select Employees > Employee List in the left-navigation menu.
- Select the row for Hank Aaron in the Agent Name table.
- Select Edit.
- Select the
Exceptions tab.

- Select Regular from the Type drop-down.
- Select
Add Exception.
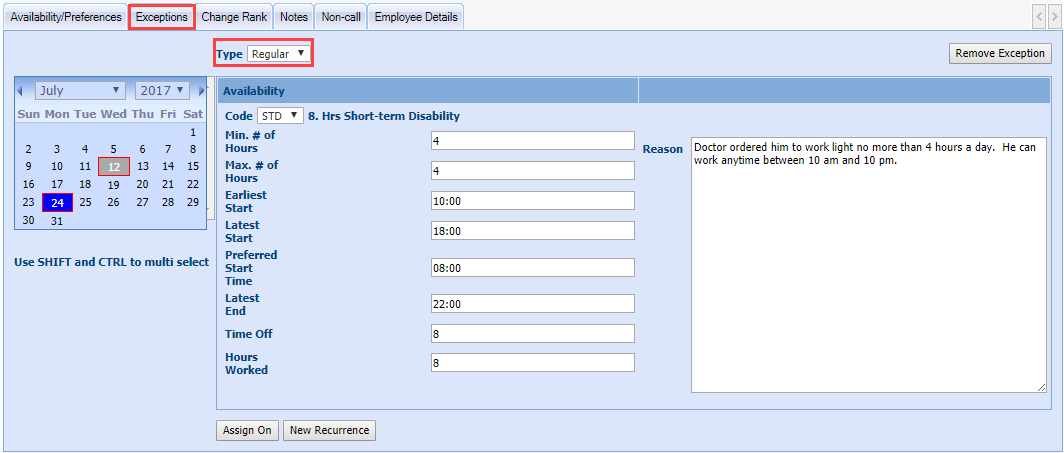
- Enter 4 in the Min # of Hours and Max # of Hours.
- Enter 10:00 as the Earliest Start.
- Enter 18:00 in the Latest Start.
- Enter 22:00 in the Latest End.
- Leave Time Off and Hours Worked to 0 as this is not a day off exception type.
- Enter a Reason, if desired.
- Select Add.
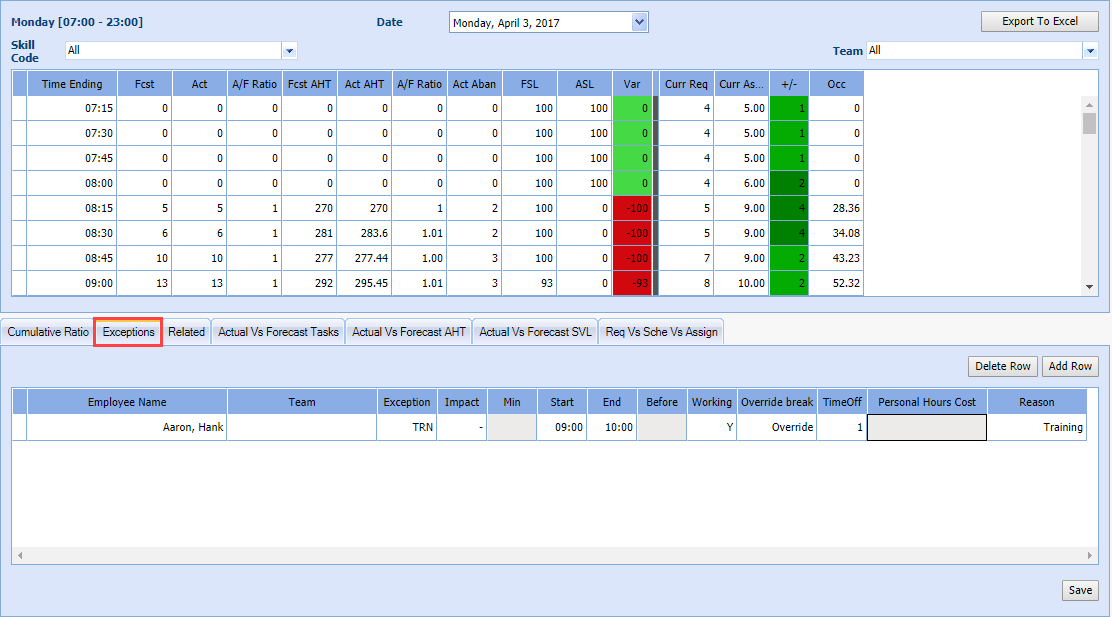
Mid-day Exceptions
Mid-day exceptions affect only part of the day rather than the entire day like regular exceptions.
There are three fundamental types of Mid-day Exceptions: Negative (-), Positive (+), and Neutral (N). When Add Row is selected, a row displays with these options:
- Negative (-) impact takes a call taker away from the available agents count.
- Positive (+) adds to the agent count.
- Neutral (N) has no effect on available agents.
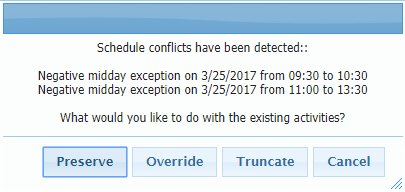
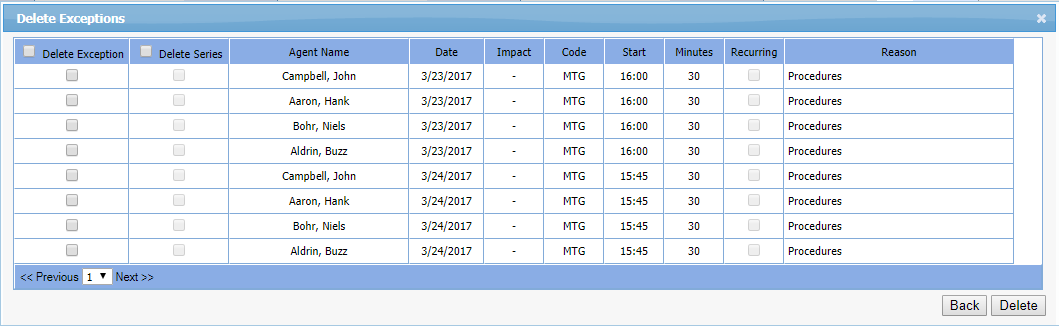
Exception Conflict Resolution
When an exception conflicts with another scheduled activity, the existing activity can be overridden, moved, truncated, or preserved. Preserve allows administrators to enter a full day's schedule of mid-day exceptions, and have Monet automatically create exceptions around the other existing activities like Breaks, lunch, non-call, and other exceptions.
Before the Roster is Generated
Preserve only becomes an option before the schedule is generated if:
- The user inputs a new mid-day exception that conflicts with an existing mid-day exception.
- The new exception must conflict and be greater than either the start of end time of the existing exception, or both.
After the Roster is Generated
The Preserve Option becomes available in the exception conflict dialog if there are any conflicts with existing activities other than "Available" time:
- Breaks
- Lunch
- Non-call
- Mid-day negative or neutral exceptions
Overlap
The new exception only occupies the space before or after the existing exception.
If there is a Full-Overlap that Exceeds Both Start and End Times of an existing exception, two new exceptions are created to fill in the space around the existing exception; and the existing exception is left intact.
Personal Hours and Time Off Hours Handling
If the new exception contains Personal Hours or Time Off hours, the value for the exception being entered is split proportionally across the new exceptions being created.
Break and Lunch:
- Move/Move Always/Override break and lunch handling is taken from the exception as it is created.
- The conflict resolution dialogue is only shown when a break or lunch will be overridden, regardless of the Move/Move Always/Override user selection. When this dialog is received, Preserve is an option. If the break or lunch can be moved with the Move/Move Always selection, the dialogue is not shown.
- The dialog is always brought up if Override is selected, and an existing activity will be deleted.
- The Preserve
option will always display except in one case:
- The exception does not exceed either the start nor the end of the existing activity (multiple if the existing activities are adjacent).
- If neither the start nor end time of the new exception goes beyond the start or end time of the existing activities, then the Preserve option is not displayed.
- When the user selects Override, the conflict dialogue is brought up. The user selects Preserve, then the breaks and lunch are kept in place.
If an exception conflicts with other scheduled activities, the exception entry conflict dialog displays showing where conflicts were detected. Choose to Preserve the existing activities, Override, Truncate, or Cancel the exception addition.
Mid-Day Exception Examples
Example 1: Agent Calls in Late
An agent calls the supervisor announcing that they are going to be two hours late due to car trouble.
- Select Staff > View Roster in the left-navigation menu to aid in reviewing existing schedules while entering exceptions.
- Select
the Exceptions tab.
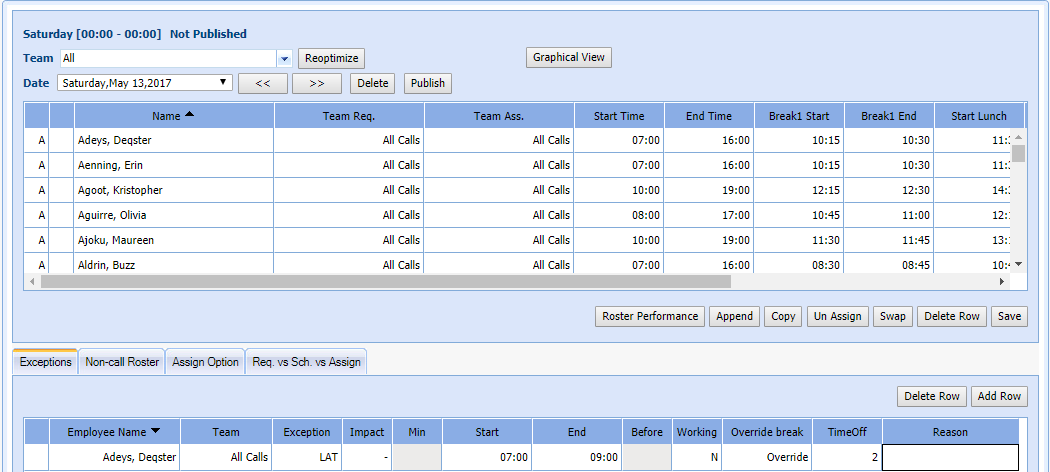
- Select Add Row.
- Select the Employee Name in the drop-down menu.
- Select the applicable exception code for Late Arrival (LAT in this case) in the Exception drop-down menu.
- Select - (minus) from the Impact drop-down menu.
- Select N in the Working drop-down menu.
- Select Override in the Override break drop-down menu if the agent's break fell when they were not at work.
- Enter the amount of time that the agent was late in the TimeOff field.
- Enter a reason for the lateness in the Reason field.
- Select Save.
Example 2: Agent Planned to Leave Early With Vacation Time
Agent Deqster Adeys has a Doctor Appointment next month and is planning to use vacation time to cover the 5 hours he'll miss on his shift. Hank the agent knows that on December 10, he will be working a 9:00 to 17:30 shift; so he has requested that he can leave at 12:00. He's also aware that he never gets a lunch before noon; so it's safe to assume that this exception is going to overlap, or remove the lunch. That means that although 5.5 hours are missed, it would only need to count as 5 vacation hours when lunch is subtracted.
- Select Manage > Exception Calendar in the left-navigation menu.
- Select the checkbox for the agent in the Agent Name table.
- Select the date of the exception in the Calendar picker.
- Select Add Exception.
- Select the Mid-day exception from the Type drop-down menu.
- Select Add Row.
- Select the Exception Code from the EXP drop-down menu.
- Select - (minus) from the Impact drop-down menu.
- Enter the Start and End times of the exception.
- Select N in the Working drop-down menu because the agent is not working.
- Select Override in the Override break drop-down menu.
- Enter the number of hours the exception applies to in the TimeOff cell.
- Enter the number of vacation hours used in the Personal Hours Cost drop-down menu.
- Enter a reason for the exception in the Reason cell.
- Select Add to add the exception.
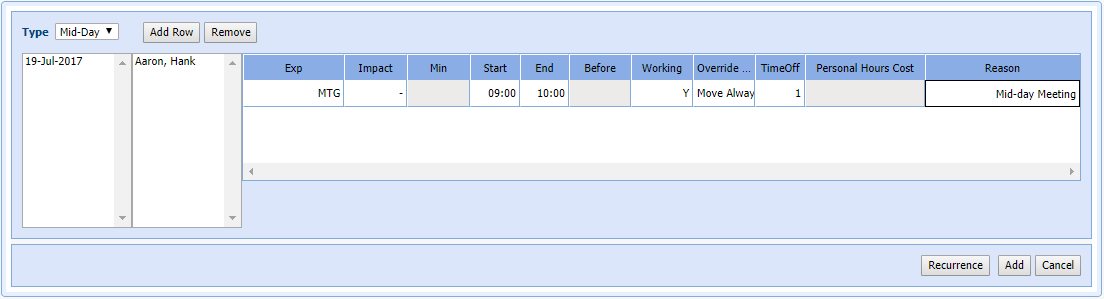
Example 3: Agent in Training Session
Agent Hank must attend a mandatory training session. The time is already decided, so the supervisor must simply enter the times into Monet.
- Select Manage > Exception Calendar in the left-navigation menu.
- Select
Add Exception.
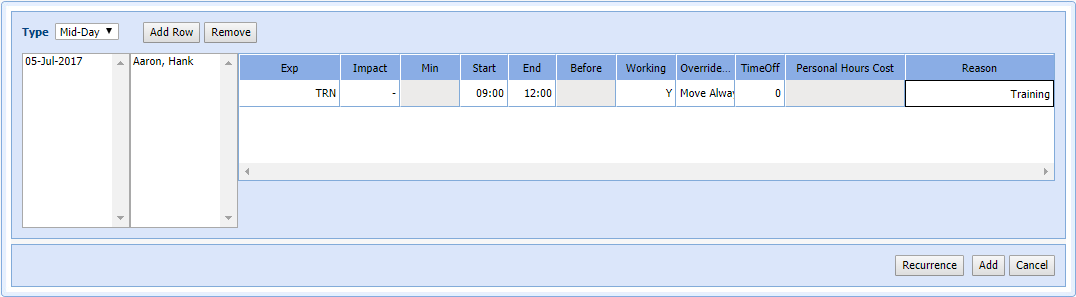
- Select Mid-Day from the Type drop-down.
- Select Add Row.
- Select the appropriate exception code for training (TRN) from the EXP drop-down menu.
- Select - (minus) from the Impact drop-down menu.
- Enter the Start and End times of the exception.
- Select Move Always in the Override break drop-down menu.
- Select Y in the Working drop-down menu because the agent is working.
- Enter 0 in the TimeOff field.
- Enter a reason for the exception in the Reason field.
- Select Save.
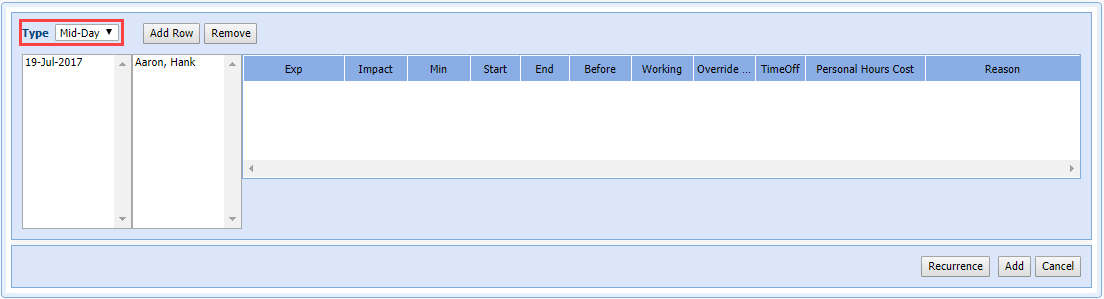
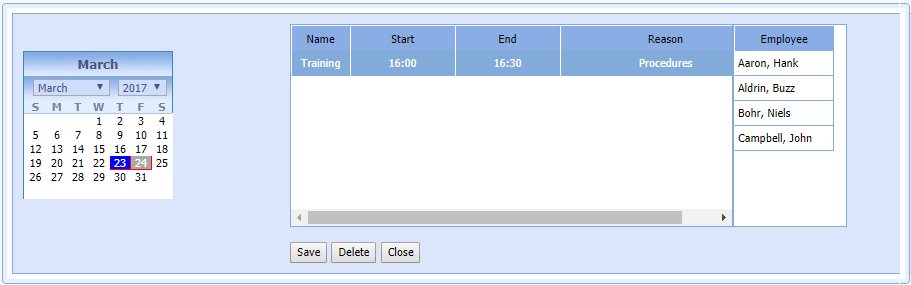
Example 4: Multiple Agents Meeting With Supervisor
Supervisor Buzz Aldrin wants to find an optimal time to meet with a group of agents for 30 minutes to discuss a new process being rolled out next month. The supervisor selects everyone on his team that works a similar time of day, and allows Monet to present some possibilities.
- Select Manage
> Exception Calendar in the left-navigation
menu.

- Select the check boxes of the agents and supervisors needed for the meeting in the Agent Name table.
- Select the possible meeting dates from the Calendar picker.
- Select Add
Exception.
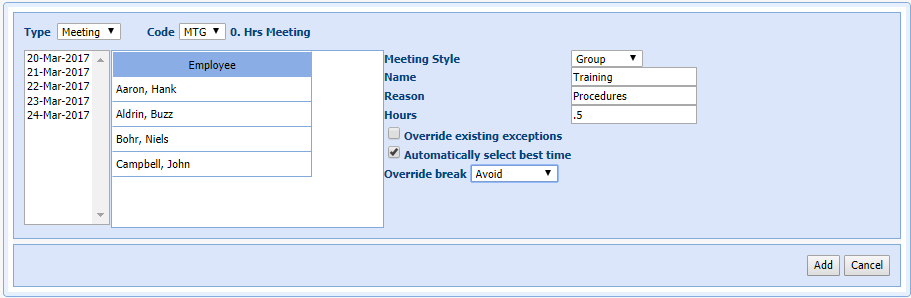
- Select Meeting in the Type drop-down menu.
- Select the appropriate code for Meetings (MTG) in the Code drop-down menu.
- Select the Meeting Style (Individual or Group).
- Enter a Name and Reason.
- Enter .5 in Hours.
- Select the check box for Automatically select best time.
- Leave Override break set to the default of Avoid.
- Select Add to place the meeting.
- Wait
until the system returns results for selecting the best time. You
can check to see if all the requested agents will be able to attend.


Example 5: Agent Staying Late for Overtime
Due to higher call volumes than expected, Supervisor Sandy is asking all her agents that leave at 17:30 if someone can stay another hour to cover until 18:30. Agent Hank Aaron volunteers.
- Select Staff > View Roster > Exceptions.
- Select Add Row.
- Select the agent name in the Agent Name table.
- Select the appropriate exception code for overtime (ORT).
- Enter 60 in the Min field.
- Select A in the Before drop-down menu.
- Enter a Reason.
- Select Save.
Example 6: Recurring Exceptions
The supervisor wishes to set up a series of training session for a new agent and have it appear on the Agent's exception calendar.
- Select Employee > Employee List.
- Highlight the appropriate agent.
- Select Edit.
The Agent Profile window opens:
- Select the Exceptions tab.
- Select the date of the first occurrence of the exception.
- Select New Recurrence.
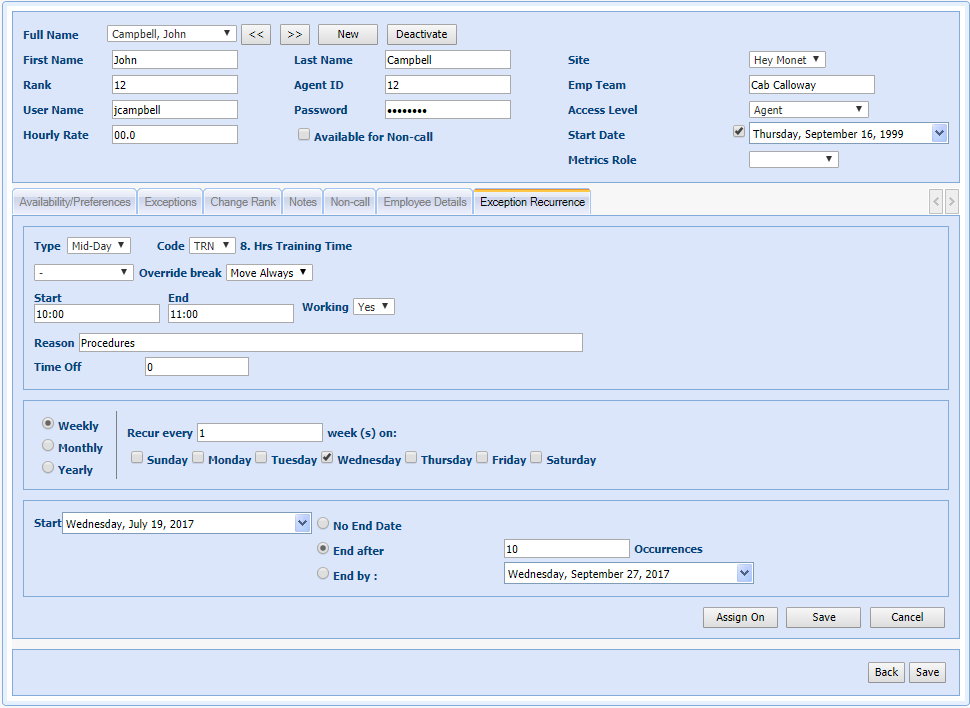
- Select Mid-Day in the Type drop-down menu.
- Select the appropriate code for training (TRN).
- Select - (minus) in the drop-down menu.
- Select Move Always in the Override break drop-down menu.
- Enter the Start and End times for the meeting.
- Select Yes in the Working drop-down menu.
- Enter a Reason.
- Leave Time Off as 0.
- Select the appropriate recurrence period radio button (Weekly, Monthly Yearly).
- Enter the recurrence period in the Recur every ... week(s) on field.
- Select the check box of the day(s) the meeting should occur.
- Select the Start Date in the drop-down menu.
- Select
the appropriate radio button when the meetings should end (No End
Date, End after, End by):
- For the End After button, enter the number of Occurrences.
- For End by, select a date in the drop-down menu.
- Select Save.