Graphical View
Graphical View is a dashboard that provides a quick and easy way to view staffing for a particular day, use staffing stats for that day, and make changes all in the same place. It also shows you the impact of those changes.
What do you want to do?
Tasks in this Topic Include:
- Set Filters
- Filters
- Display Graphical View Table
- Legend
- Modify the Row Headings to Display
- Making Adjustments to Previous or Next Day
- Unassigning an Agent to a Shift
- Assigning an Agent to a Shift
- Schedule Level Functions
- Exception Conflict Resolution
- Before the Roster is Generated
- After the Roster is Generated
- Overlap
- Personal Hours and Time Off Hours Handling
- Break and Lunch
- Reoptimize
Related Tasks:
See Also:
Set Filters
To get to the graphical view, go to Staff > Graphical View.
The landing page displays with filters. You can filter and modify the view by date; sort by Start Time, End Time, and Employees; view by Skill Team, Emp Team, and Site. You have the option to choose just one, or all of them.

Filters
|
Filters Fields |
Description |
|---|---|
| Date | A list of dates |
| Sort By |
Start Time (earliest shift start time, and latest shift start time) End Time (earliest shift end times, and latest shift end time) Employees (last name in alphabetical order) |
| Assigned Only | Unchecking thus box will show all empty shifts (any shift that is not assigned to an agent). These shifts will display in bright yellow. |
| Skill Team | A list of available skill teams (multi-select) |
| Emp Team | A list of available employee teams (multi-select) |
| Site | A list of available sites (multi-select) |
| Apply | Displays the graphical view table and populates the empty fields in the filters section |

|
Click to view the next or previous daily roster |
| View Roster | Opens the View Roster screen |
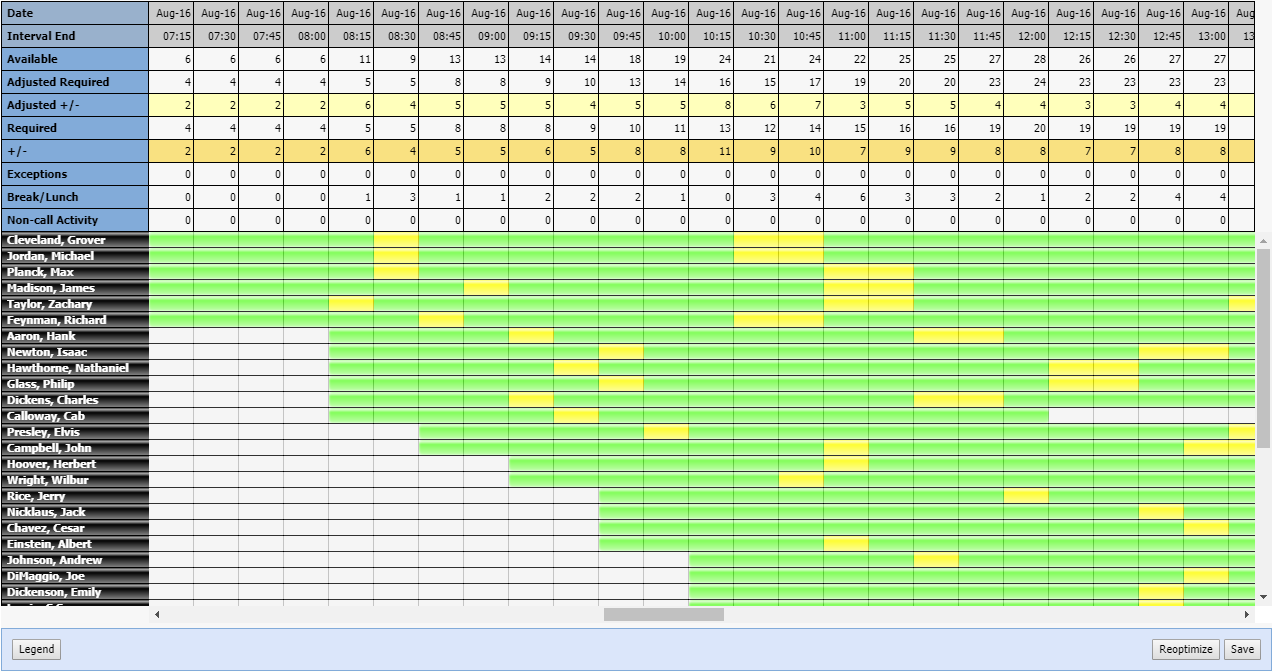
Display Graphical View Table
After selecting the filters, clicking Apply displays the Graphical View Table. This table contains one row for each rostered agent as well as staffing information per interval. The shift intervals display in columns.
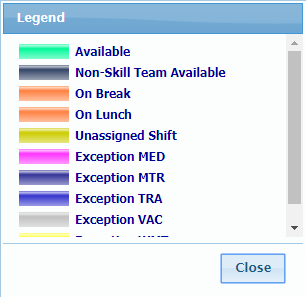
Legend
The Legend displays a breakdown of all the available activities that could be found in an agent’s schedule, and the corresponding color code. This is set up in RTA Configuration in the Setup module, and also appears in Real Time Adherence in the Manage module.
Modify the Row Headings to Display
By default, the last selected filters are shown in the graphical view table. You can choose to display (or not) by right-clicking on one of the row headings, and unchecking the box(es) next to the header name. Then click out of the box to modify the view.

|
Filters for Statistical Information Fields |
Description |
|---|---|
| Date (Required) | The date of the interval |
| Interval End (Required) | The end time of the interval (for example: 4 a.m. is the interval ending time for 3:45 to 4 a.m.) |
| Available | The number of agents currently scheduled as available for that interval |
| Adjusted Required | This comes from the forecast and is the number of agents Monet is recommending that you have based on call volume and shrinkage. |
| Adjusted +/- | The difference between available agents and the Adjusted Required |
| Required | The number of agents Monet is recommending based solely on call volume. It does not include shrinkage |
| +/- | The variance (+ or -) is the difference between the available agents and the Required number |
| Exceptions | Per interval how many agents are scheduled for an exception |
| Break/Lunch | Per interval how many agents are scheduled for a break/lunch |
| Non-call Activity | Per interval how many agents are scheduled for a non-call activity |
| Employee Names | A list of agents sorted by last name and their corresponding schedules |
| Save | When making any modification in the graphical view (whether adding, modifying, or deleting), select Save to retain changes. |
Making Adjustments to Previous or Next Day
In a 24x7 environment, the preceding and following days can be viewed by scrolling left or right.
To modify a scheduled activity in a shift, arrow over the activity you wish to change, and either right click, or drag and drop.

Unassigning an Agent to a Shift
An agent can be un-assigned directly from the table.
- Right-click on the agent's name, and select Un-Assign.

- The Un-Assign menu displays (for 24x7 environments).
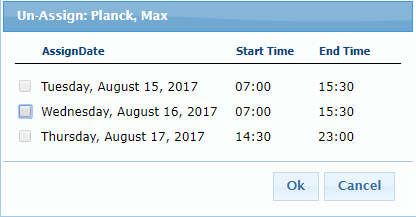
- Check the box with the date to un-assign.
- Select OK.
- Click Save.
- The agent is removed from the roster.
Assigning an Agent to a Shift
Refer to View Roster to assign another agent to a shift.
Schedule Level Functions
Right-clicking on any activity will give you the options to: Change Length or Delete
Slot.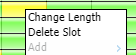
If you select Change Length,
a menu displays. Enter the Start
and End time. 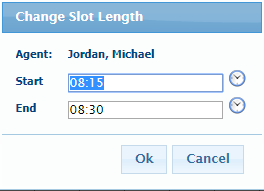
If you select Delete Slot,
a confirmation message displays. 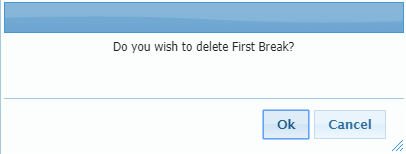
Right-clicking in any Available section provides the options to add a new activity: Exception; Non-call; and Break or Lunch, if allowed.
An available slot is colored
according to the Legend (in this case green).
If an agent does not have breaks or a lunch assigned, right-clicking
will display the Add menu. (If
already assigned, these choices are grayed out.)
Clicking Lunch or Break
displays a menu. 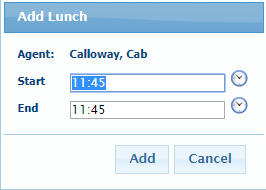
Clicking Non-call Slot displays
a menu. 
Clicking Exception adds a mid-day exception.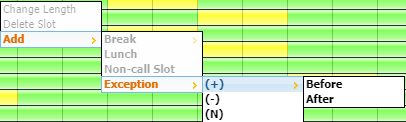
You can choose a Positive (+) impact (also select Before or After the shift), Negative (-) impact, or Neutral (N) impact.
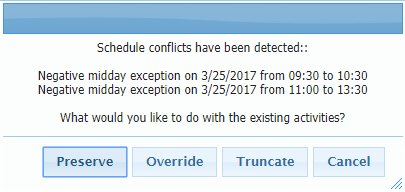
Exception Conflict Resolution
When an exception conflicts with another scheduled activity, the existing activity can be overridden, moved, truncated, or preserved. Preserve allows administrators to enter a full day's schedule of mid-day exceptions, and have Monet automatically create exceptions around the other existing activities like Breaks, lunch, non-call, and other exceptions.
Before the Roster is Generated
Preserve only becomes an option before the schedule is generated if:
- The user inputs a new mid-day exception that conflicts with an existing mid-day exception.
- The new exception must conflict and be greater than either the start of end time of the existing exception, or both.
After the Roster is Generated
The Preserve Option becomes available in the exception conflict dialogue if there are any conflicts with existing activities other than "Available" time:
- Breaks
- Lunch
- Non-call
- Mid-day negative or neutral exceptions
Overlap
The new exception only occupies the space before or after the existing exception.
If there is a Full-Overlap that Exceeds Both Start and End Times of an Existing Exception, two new exceptions are created to fill in the space around the existing exception; and the existing exception is left intact.
Personal Hours and Time Off Hours Handling
If the new exception contains Personal Hours or Time Off hours, the value for the exception being entered is split proportionally across the new exceptions being created.
Break and Lunch
- Move/Move Always/Override break and lunch handling is taken from the exception as it is created.
- The conflict resolution dialogue is only shown when a break or lunch will be overridden, regardless of the Move/Move Always/Override user selection. When this dialog is received, Preserve is an option. If the break or lunch can be moved with the Move/Move Always selection, the dialogue is not shown.
- The dialog is always brought up if Override is selected, and an existing activity will be deleted.
- The Preserve
option will always display except in one case:
- The exception does not exceed either the start nor the end of the existing activity (multiple if the existing activities are adjacent).
- If neither the start nor end time of the new exception goes beyond the start or end time of the existing activities, then the Preserve option is not displayed.
- When the user selects Override, the conflict dialogue is brought up. The user selects Preserve, then the breaks and lunch are kept in place.
If an exception conflicts with other scheduled activities, the exception entry conflict dialog displays showing where conflicts were detected. Choose to Preserve the existing activities, Override, Truncate, or Cancel the exception addition.
Reoptimize
Reoptimize will shift breaks, lunches, and non-call activities in the roster based on the current forecast.
- Check the boxes for the activities
you wish to reoptimize.
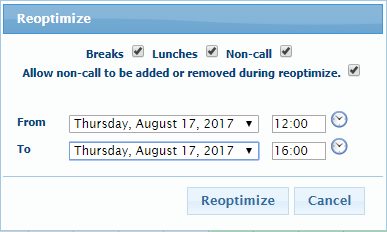
If you want to add or remove non-call activities based on staffing levels, check Allow non-call to be added or removed during reoptimize. - When Reoptimize
is clicked, a confirmation message will display.
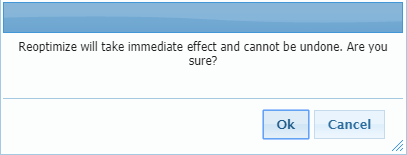
- Select OK.