Set Up Forecasting Parameters
The purpose of forecasting is to obtain the required number of agents needed to achieve a desired service level goal. This requirement is used to create the roster where your agents will be assigned.
What do you want to do?
Tasks in this Topic Include:
- Access Forecasting
- Set Forecast Precision
- Set Forecast Seed
- Set the Current Day Cumulative Ratio Default Settings
- Set Skill Team / Skill Coverage
Related Tasks:
Access Forecasting
To access forecasting:
- Select Setup from the left-navigation menu.
- Select Workgroups.
- Select the Forecasting tab.
- Select the Group Name to edit forecasting values.
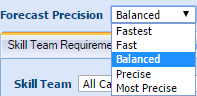
Set Forecast Precision
Forecast Precision is a choice between the speed at which a forecast is produced, and the accuracy of the number of agents required. The more precise the forecast, the longer it takes Monet to calculate the forecast.
- Select the desired forecast precision from the drop-down menu.
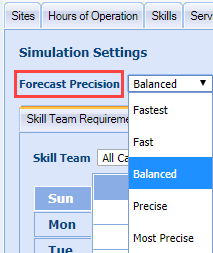
Fastest - Creates a forecast quickly by reducing the optimization steps to a minimum
Fast - Creates a forecast with more than the minimum optimization steps
Balanced - Creates a forecast that balances the speed of creating the forecast with the number of optimization steps taken
Precise - Creates a forecast using more than the minimum, and less than the maximum optimization steps
Most Precise - Creates a forecast using the maximum optimization steps
Set Forecast Seed
Forecast Seed determines how Monet will simulate the distribution of calls during forecasting.
- Skill Sorting - When a skill can be answered in more than one Skill Team, Monet will send all the calls to the most efficient team. The most efficient team is the team that requires the least amount of people to handle the expected workload.
- Employee Availability - Monet will distribute the calls to all skill teams based on how many agents are in each team.
- Select the Forecast Seed type from the drop-down menu.
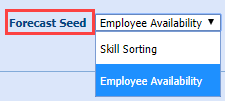
- Select the desired setting.
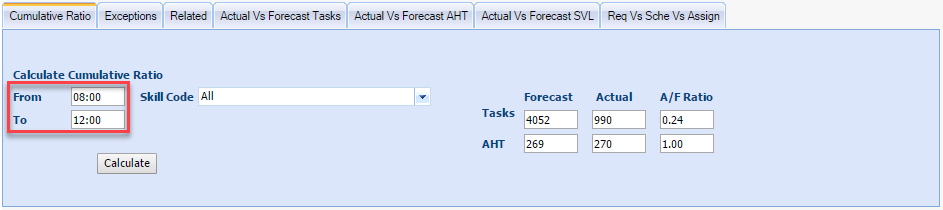
Set the Current Day Cumulative Ratio Default Settings
Users can set default intervals to be used when calculating the Cumulative Ratio of "Forecast versus Actual" calls and "AHT." The Cumulative Ratio is used in the Intra-day process to evaluate skill team performance.

- In the From interval field enter the desired value. This will be the start of the window. Only values which coincide with an interval start time are allowed. Ineligible times will automatically convert to the nearest interval start time. Intervals are in 15-minute increments: 8:00, 8:15, 8:30, etc.
- In the "To" interval offset from current interval field,
select a value from 0 to -24 from the drop-down menu. This field
will set the end of your window based upon the current time.
0 = current interval
-1 = the previously completed interval. If the current time is 9:07, and the Administrator sets the setting to -1, the To field automatically populates with 9:00 (data from 8:45 - 9:00).
-2 = If the current time is 9:07, and the Administrator sets the setting to -2, the To field automatically populates with 8:45 (data from 8:30 – 8:45).
For example: The Administrator accesses the screen at 13:07. The Cumulative Ratio is calculated based on the default settings. The "From" simulation time defaults to 13:15. The "To" simulation time is set by the Workgroup end hours.
If the +1 crosses the last interval of the Workgroup’s hours, the interval sets back to the current interval.
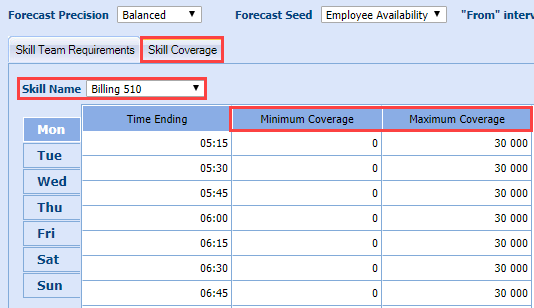
Set Skill Team / Skill Coverage
Set the Minimum and Maximum Requirements for either the Skill Team or Skill Name.
To set the Skill Team Requirement:
- Select the Skill Team Requirements tab.
- Select the Skill Team from the drop-down menu.
- Enter the Minimum Coverage and Maximum Coverage values for each time period, OR perform a Bulk Update.
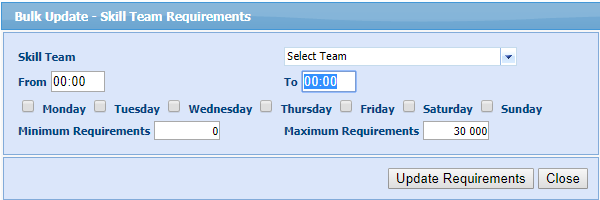
- Select Bulk Update to update values for multiple time periods across multiple days.
- Select the appropriate Skill Team check boxes from the drop-down menu.
- Enter the From and To time periods to update.
- Select the check boxes of the days to apply the update.
- Enter Minimum Requirements and Maximum Requirements values.
- Select Update Requirements.
To set the Skill Coverage:
- Select the Skill Coverage tab.
- Select the Skill Name from the drop-down menu.
- Enter the Minimum Coverage and Maximum Coverage values for each time period, OR perform a Bulk Update (see below).
- Select Bulk Update to update values for multiple time periods across multiple days.
- Select the appropriate Skill Code check boxes from the drop-down menu.
- Enter the From and To time periods to update.
- Select the check boxes of the days to apply the update.-
- Enter Minimum Coverage and Maximum Coverage values.
- Select Update Requirements.