Staffing
The Staffing option allows you to generate a report based on staffing levels, including absenteeism. The filter region is where specific criteria is selected and applied to generate the Staffing report.
NOTE: The attrition
rate is driven by the active/inactive agent status.
What do you want to do?
Tasks in this Topic Include:
- Access Staffing
- Target Resource - Workgroup
- Target Resource - Site
- Target Resource - Skill Team
- Target Resource - Supervisor
- Target Resource - Agent
- Target Resource - Employee Team
- View Reports
- Export Charts and Reports
Related Tasks:
Access Staffing
- Select Metrics from the left-navigation menu.
- Select Staffing.
Select Report Parameters
Select the report parameters for the desired report as follows:
Target Resource - Workgroup
- Select Workgroup
from the Target Resources drop-down menu.

- Select the calendar icon to select the Active after: date.
- Select the specific workgroup from the drop-down menu to the right of the Active after: date.
- Select the Reference Period drop-down menu.
- Select the calendar to set the Period.
- Select the Status from the drop-down menu.
- Select Apply.
NOTE: For detailed
information about the chart, see Chart Descriptions.
Target Resource - Site
- Select Site
from the Target Resources drop-down menu.

- Select the calendar icon to select the Active after: date.
- Select the specific Site from the drop-down menu to the right of the Active after: date.
- Select the Reference Period drop-down menu.
- Select the calendar to set the Period.
- Select the Status from the drop-down menu.
- Select Apply.
NOTE: To clear all fields, click the Reset button.
Target Resource - SkillTeam
- Select SkillTeam
from the Target Resources drop-down menu.

- Select the calendar icon to select the Active after: date.
- Select the specific SkillTeam from the drop-down menu to the right of the Active after: date.
- Select the Reference Period drop-down menu.
- Select the calendar to set the Period.
- Select the Status from the drop-down menu.
- Click Apply.
NOTE: To clear all fields, click the Reset button
Target Resource - Supervisor
- Select Supervisor
from the Target Resources drop-down menu.

- Select the calendar icon to select the Active after: date.
- Select the specific Supervisor from the drop-down menu to the right of the Active after: date.
- Select the Reference Period drop-down menu.
- Select the calendar to set the Period.
- Select the Status from the drop-down menu.
- Select Apply.
NOTE: To clear all fields, click the Reset button.
Target Resource - Agent
- Select Agent
from the Target Resources drop-down menu.

- Select the calendar icon to select the Active after: date.
- Select the specific Agent from the drop-down menu to the right of the Active after: date.
- Select the Reference Period drop-down menu.
- Select the calendar to set the Period.
- Select the Status from the drop-down menu.
- Select Apply.
NOTE: To clear all fields, click the Reset button.
Target Resource - Employee Team
- Select Employee
Team from the Target Resources
drop-down menu.

- Select the calendar icon to select the Active after: date.
- Select the specific Employee Team from the drop-down menu to the right of the Active after: date.
- Select the Reference Period drop-down menu.
- Select the calendar to set the Period.
- Select the Status from the drop-down menu.
- Select Apply.
NOTE: To clear all fields, click the Reset button.
Viewing Reports
The report selected is displayed:
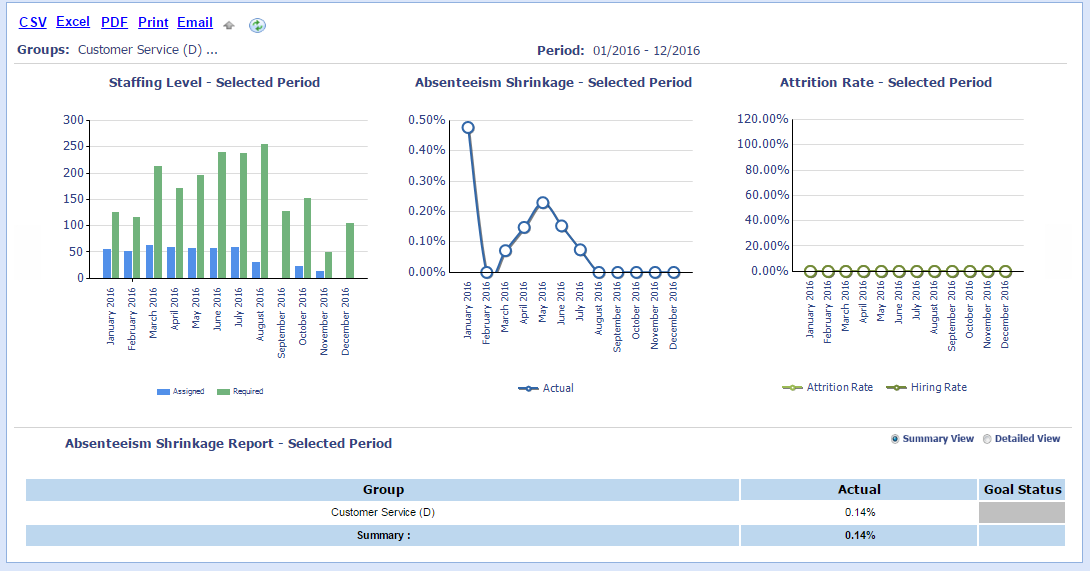
NOTE: Use the view
options to review different levels of detail.
- Select the Summary View radio button to review the summarized target resource details.
- Select the Detailed View radio button to review staffing details by Supervisor/Agent.
Chart Descriptions
The following descriptions are provided for additional information.
|
Column |
Description |
|---|---|
|
Actual |
Shows the actual value |
|
Goal |
Shows the actual value |
|
Status |
Displays a colored icon or cell, based on actual vs. goal |
Export Charts and Reports
Select the CSV, Excel, PDF, Print, or Email link from the charting region.